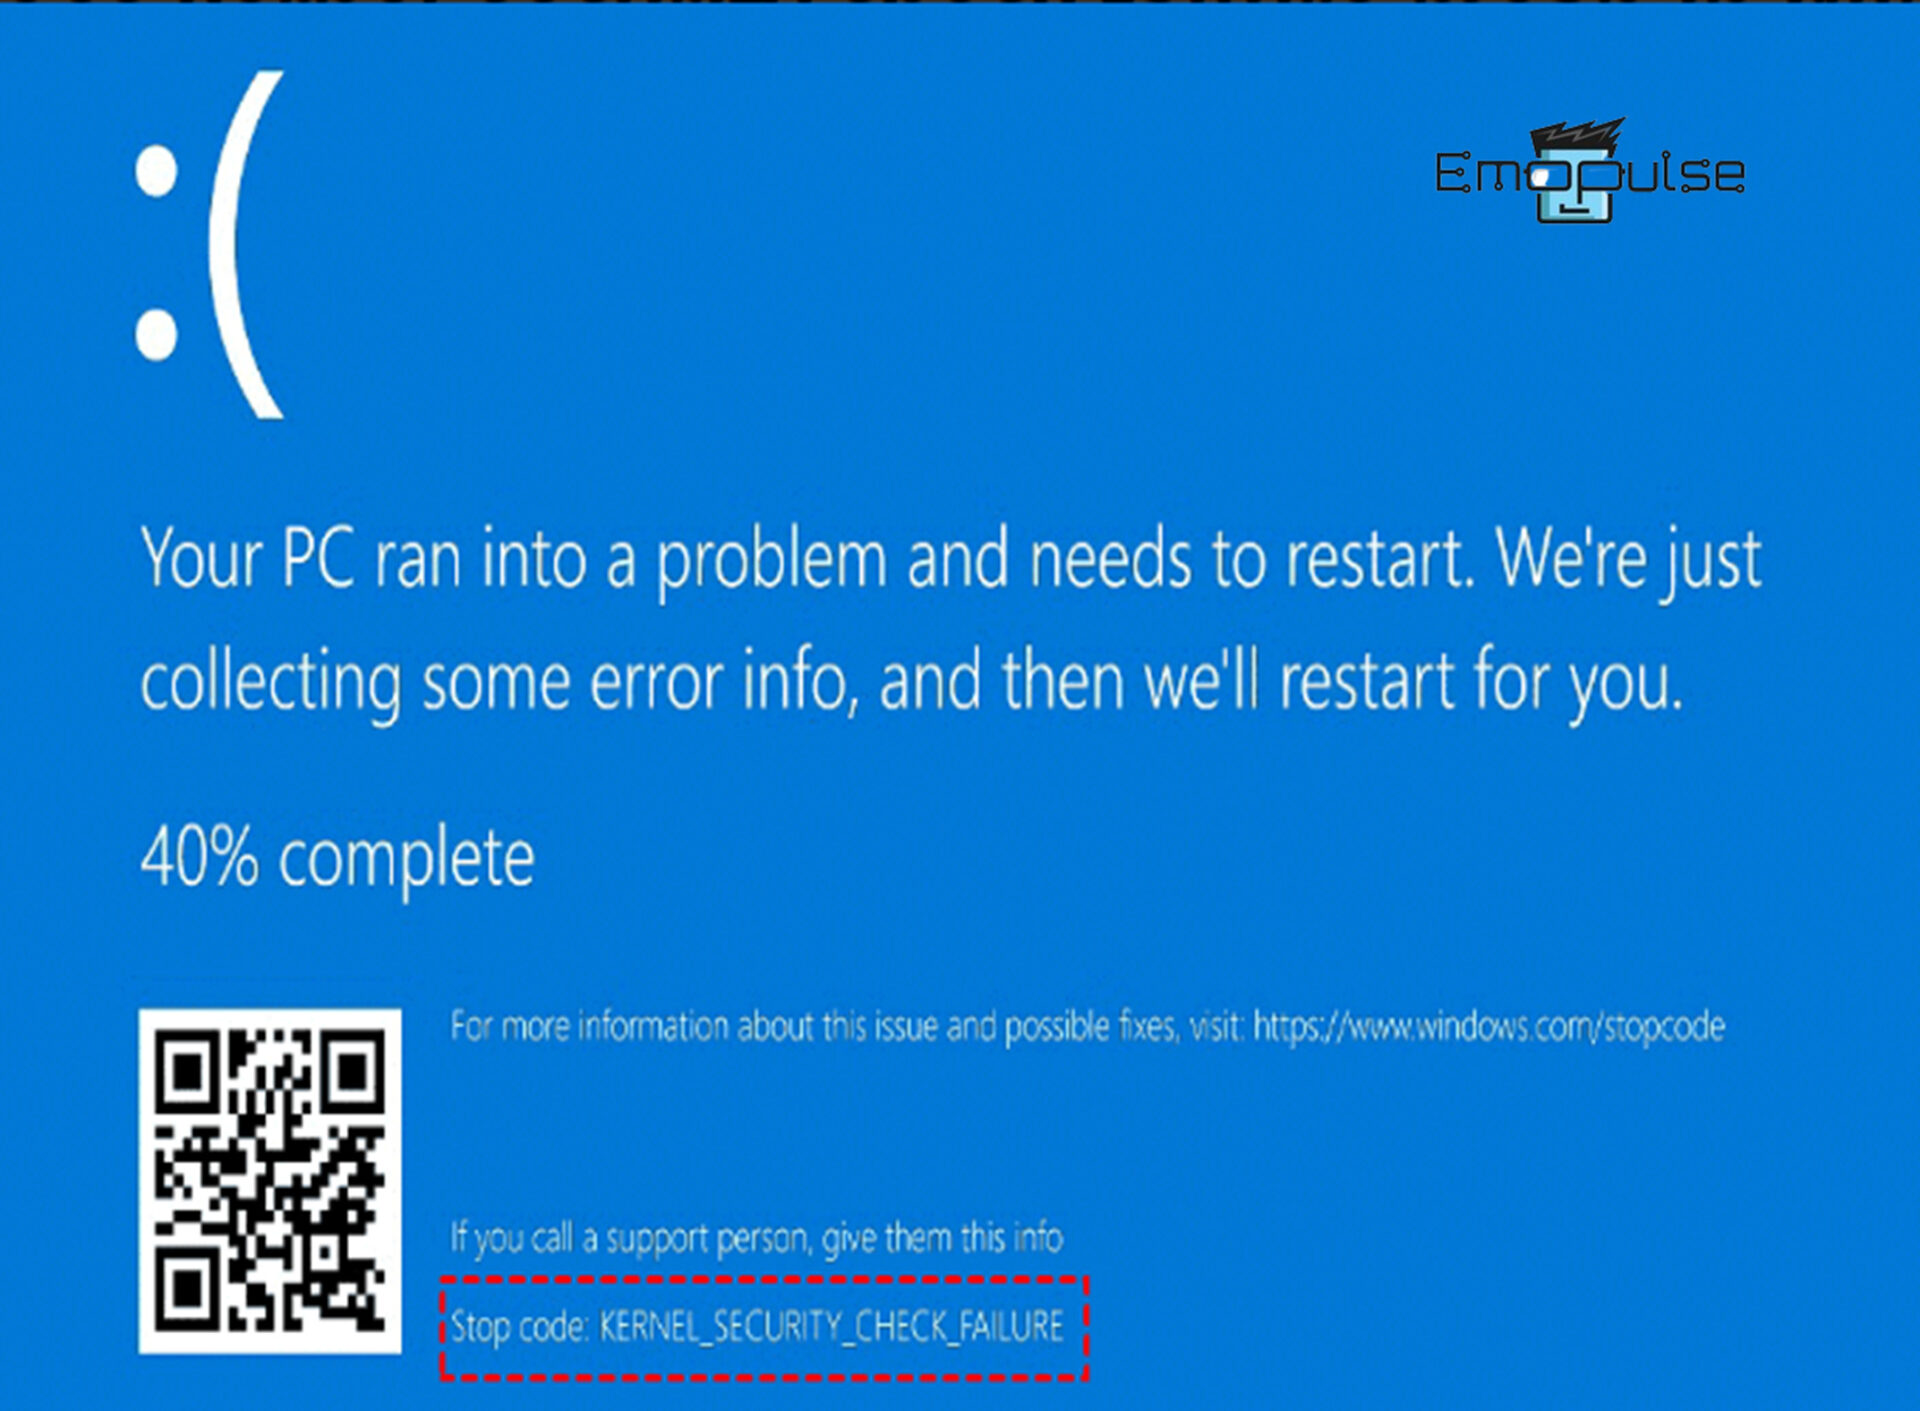
The blue or black screen of death, BSOD error comes out with various stop codes; one I’ve encountered is Kernel Security Check Failure. The causes of this error include malfunctioning hardware, outdated drivers, corrupt system files, memory issues, outdated Windows, etc. I encountered this BSOD while using Windows 11, but it’s worth noting that the same issue can also occur on Windows 10.
When this error occurs, you’ll encounter a message like “Your PC ran into a problem and needs to restart. We’re just collecting some error info, and then we’ll restart for you”, displayed on a blue or black screen.
Key Takeaways
- The Kernal Security Check Failure is associated with issues within the operating system’s kernel, which manages system resources and ensures the smooth execution of all processes.
- The reasons for this issue include malfunctioning hardware, outdated drivers, corrupt system files, memory issues, outdated Windows, etc.
- Troubleshooting steps include reinstalling drivers, running SFC, running CHKDSK, running DISM, resetting Windows, reinstalling Windows, etc.
You can proceed with these fixes for the Kernel Security Check Failure issue in Windows 11 as well as 10 with ease by following the steps mentioned below after entering the Safe Mode:
- Uninstall The Recently Installed Programs
- Uninstall Recent Windows Updates
- Reinstall Windows 11
Verify And Reinstall Drivers
Another solution I suggest when encountering this issue repeatedly is checking the drivers. Outdated or faulty drivers can contribute to this error. If you identify any problematic drivers, reinstalling them may help resolve the issue. Many users have found this method helpful in resolving this error. Here’s how you can proceed with reinstalling drivers:
Verify Drivers
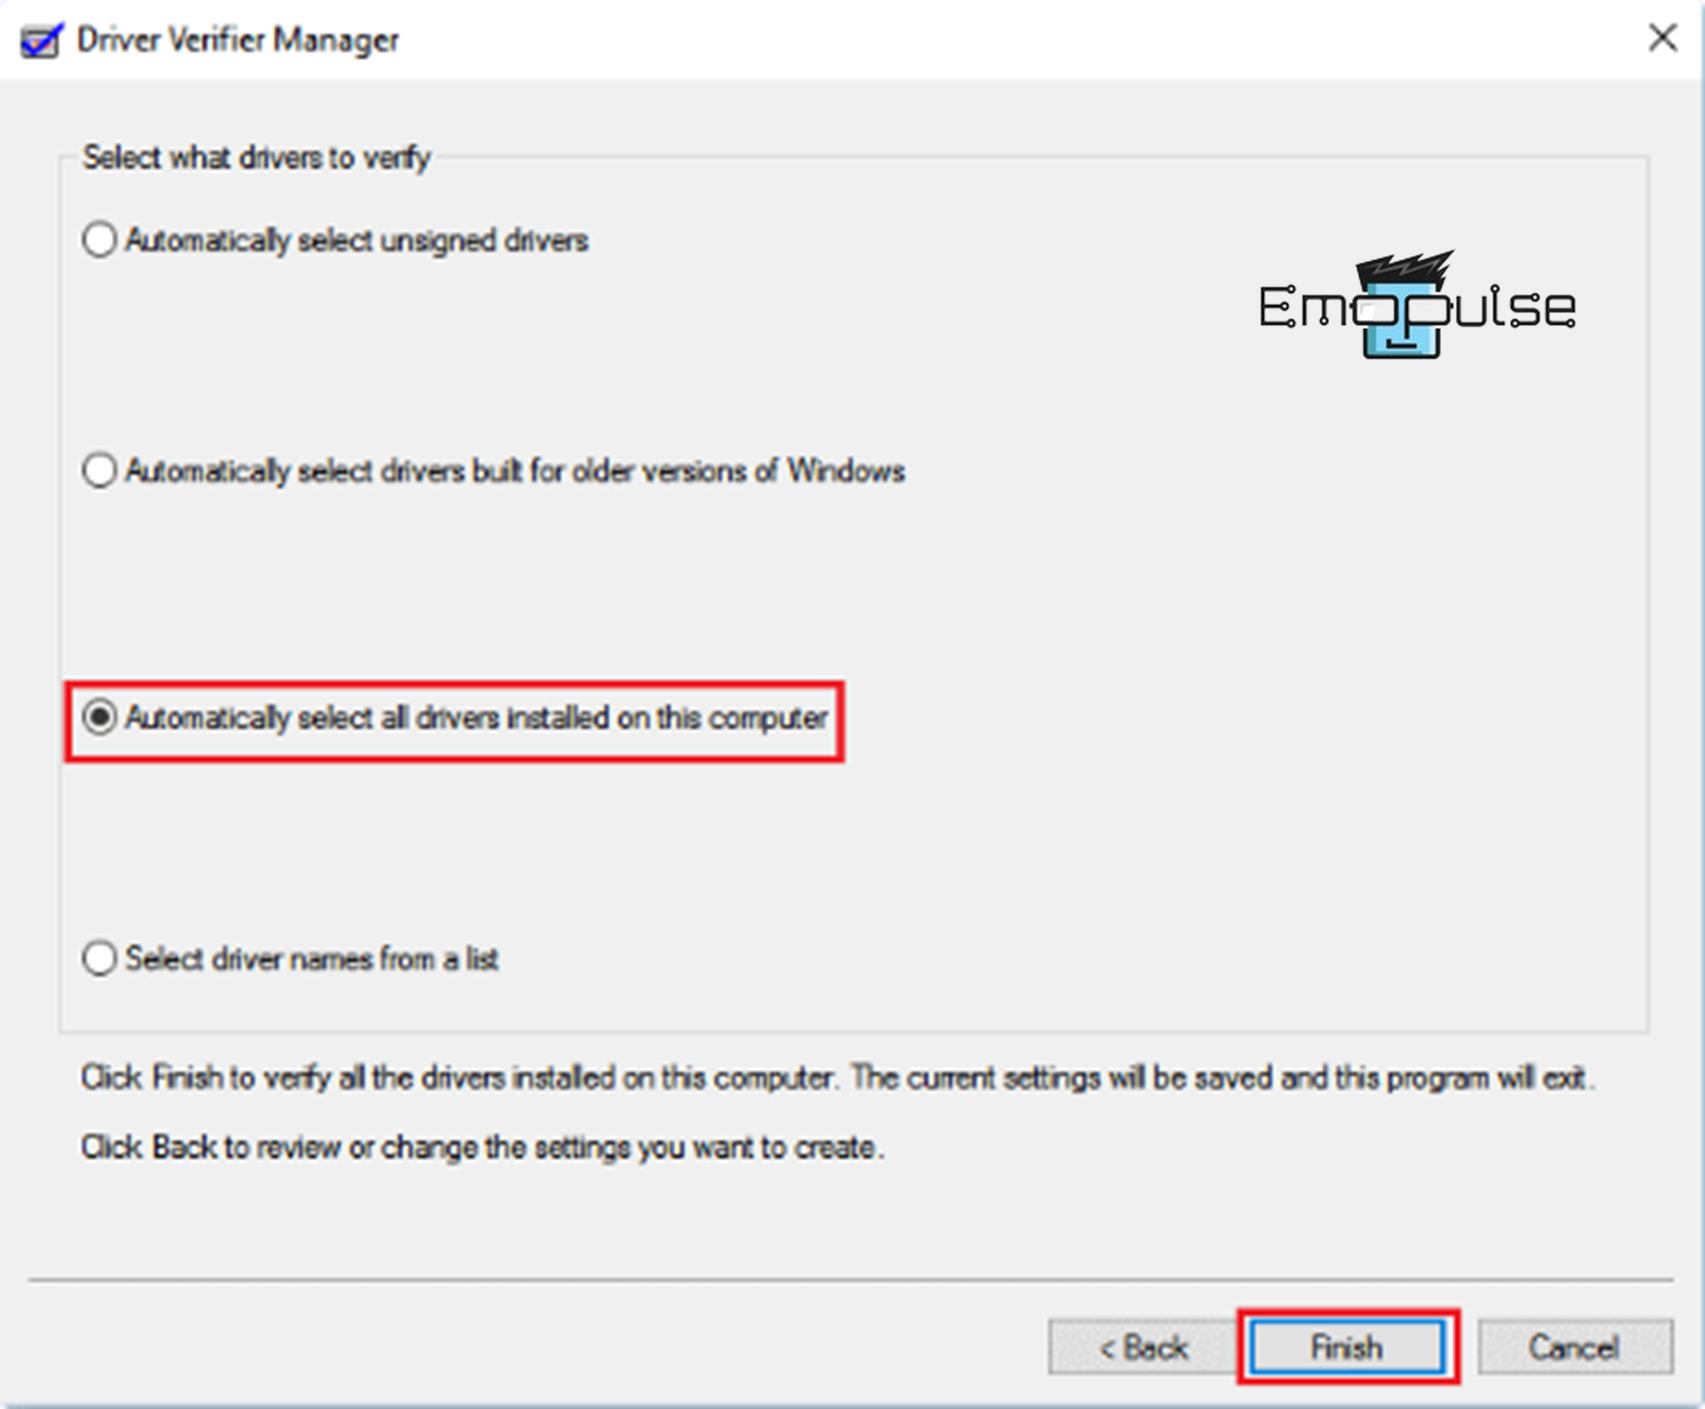
Windows has a built-in Driver Verifier Manager, which can test all installed drivers and detect any that are malfunctioning or faulty. Here are steps to test them:
- Command Prompt: Search for the Command Prompt in the Start menu, right-click, and select Run as administrator.
- Type Verifier: Enter the Verifier command and press enter.
- Select drivers: In the Driver Verifier Manager interface, select “Create standard settings > Next > Automatically select all drivers installed on this computer > Finish”.

Automatically select all drivers installed on this computer > Finish – Image Credit (Emopulse)
If you find any faulty drivers after testing them, consider reinstalling them by following the steps below:
Uninstall Drivers
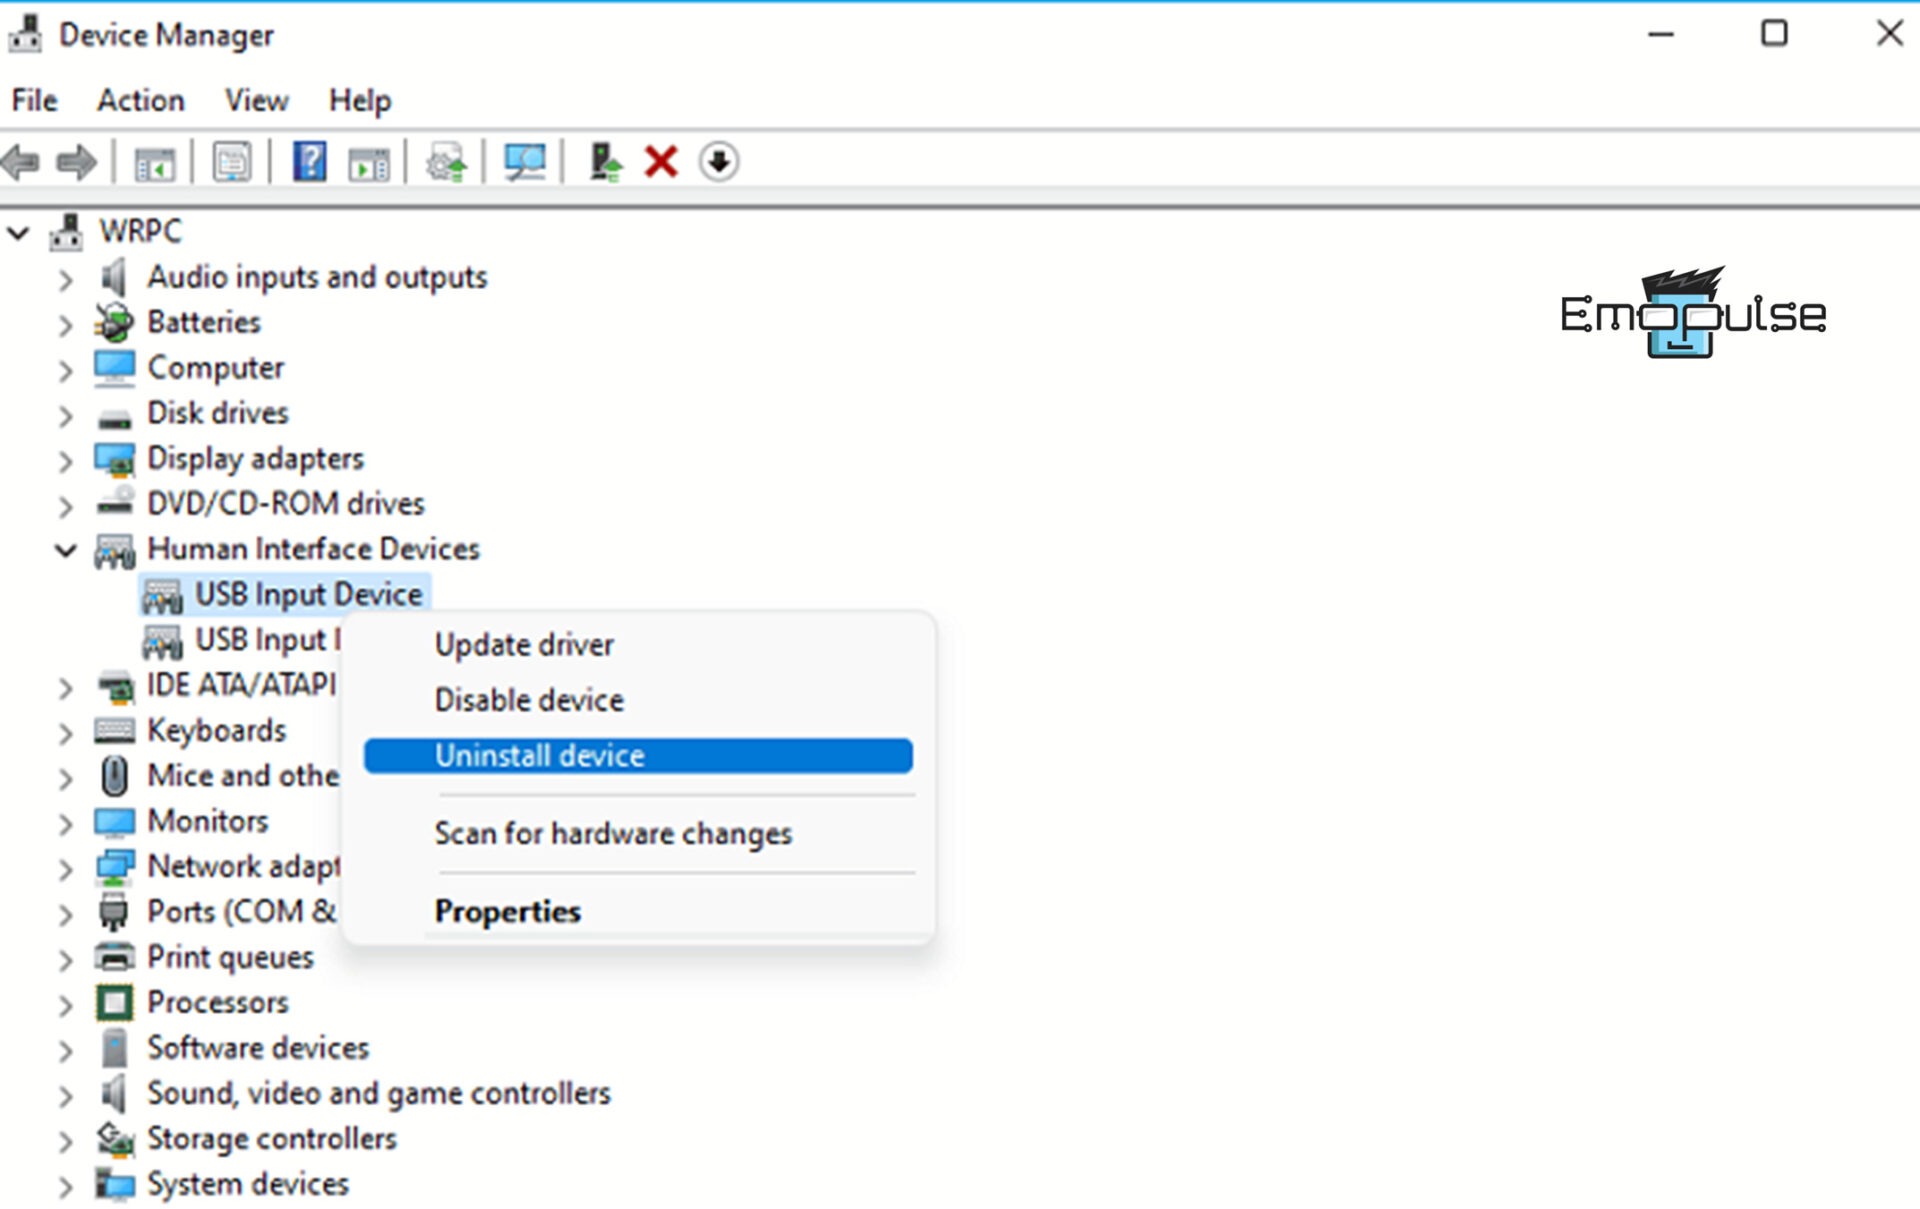
- Device Manager: Simultaneously press the Windows key + X on your keyboard, opt for Device Manager, and select the specific category you wish to expand.
- Uninstall Device: Right-click on the troublesome driver and choose Uninstall Device.

Select driver > Uninstall device – Image Credit (Emopulse) - Click Uninstall Again: When prompted for confirmation, click Uninstall again.
- Restart PC: After completing the driver uninstallation, proceed to restart your computer to ensure the removal of any remaining driver-related files from the system.
Reinstall Drivers
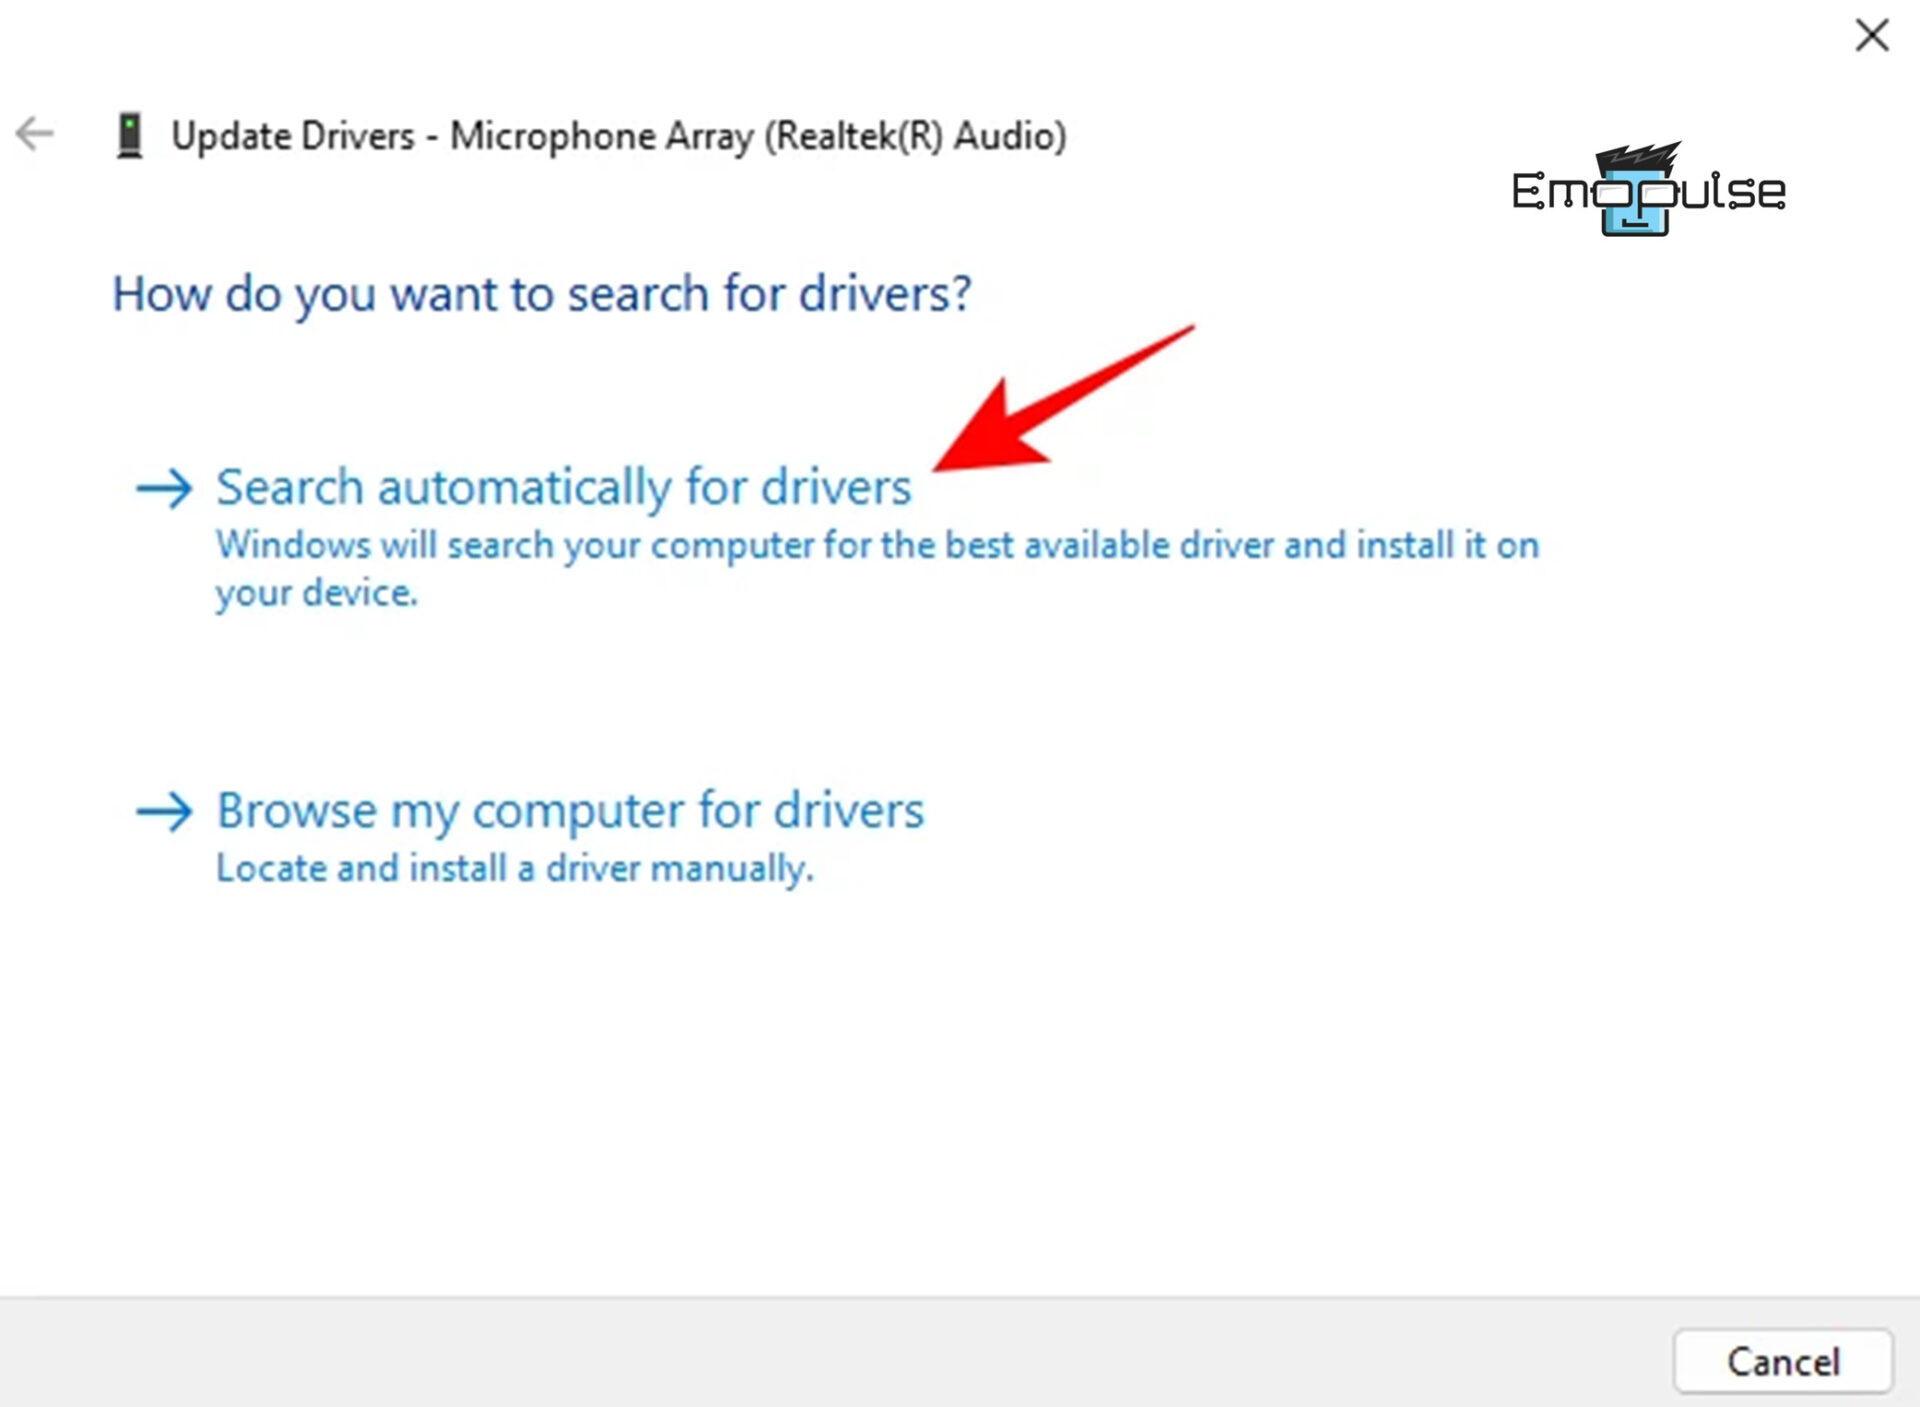
- Device Manager: Press “Win + X” again and select Device Manager.
- Select Category: Select a category to display device names, then right-click (or press and hold) on the device you wish to update. Choose “Search automatically for updated driver software” from the context menu.

Search automatically for drivers – Image Credit (Emopulse) - Follow on-screen instructions: Windows will commence an online search for the driver and proceed with its automatic installation. Follow any on-screen instructions provided if prompted.
- Device manufacturer’s website: If Windows cannot locate a new driver, consider searching for one on the device manufacturer’s website and adhere to their provided instructions.
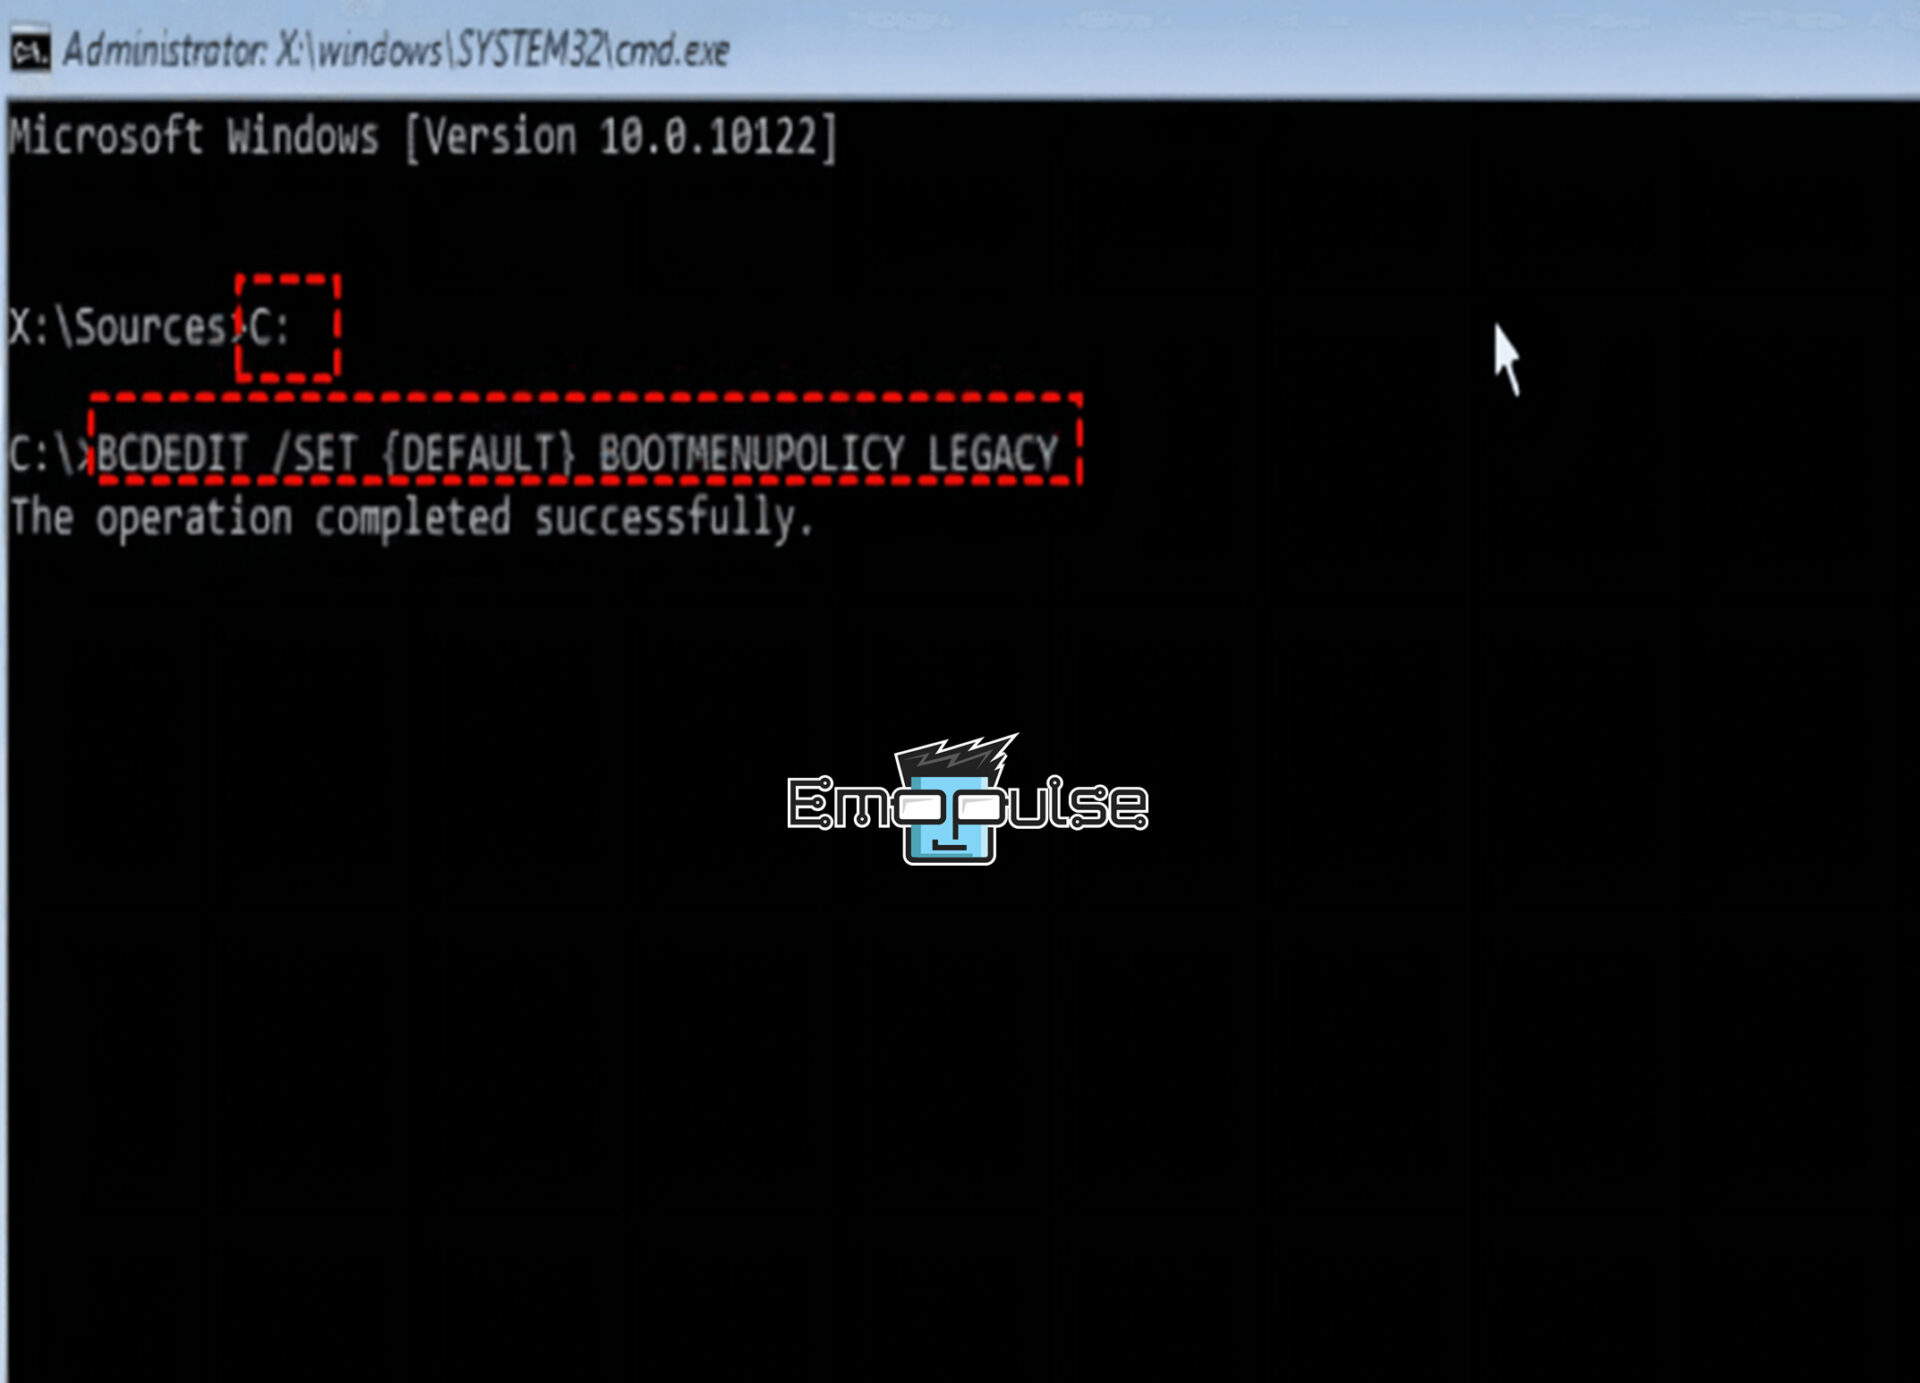
Activate The Legacy Advanced Boot Menu
Based on my team’s feedback, enabling the previous version of the advanced boot menu might resolve the Kernel Security Check Failure error. So, here are the detailed steps to activate this option:
- Command prompt: Enter into the Windows RE as mentioned above and select “Troubleshoot > Advanced Options > Command Prompt”.
- Input C: In the Command Prompt window, input “C:” and press Enter.
- Enter command: “BCDEDIT /SET {DEFAULT} BOOTMENUPOLICY LEGACY.”

Activate legacy advanced boot menu – Image Credit (Emopulse) - Restart PC: Enter exit and press Enter to close the Command Prompt. After restarting your computer, check if the blue screen error message persists.
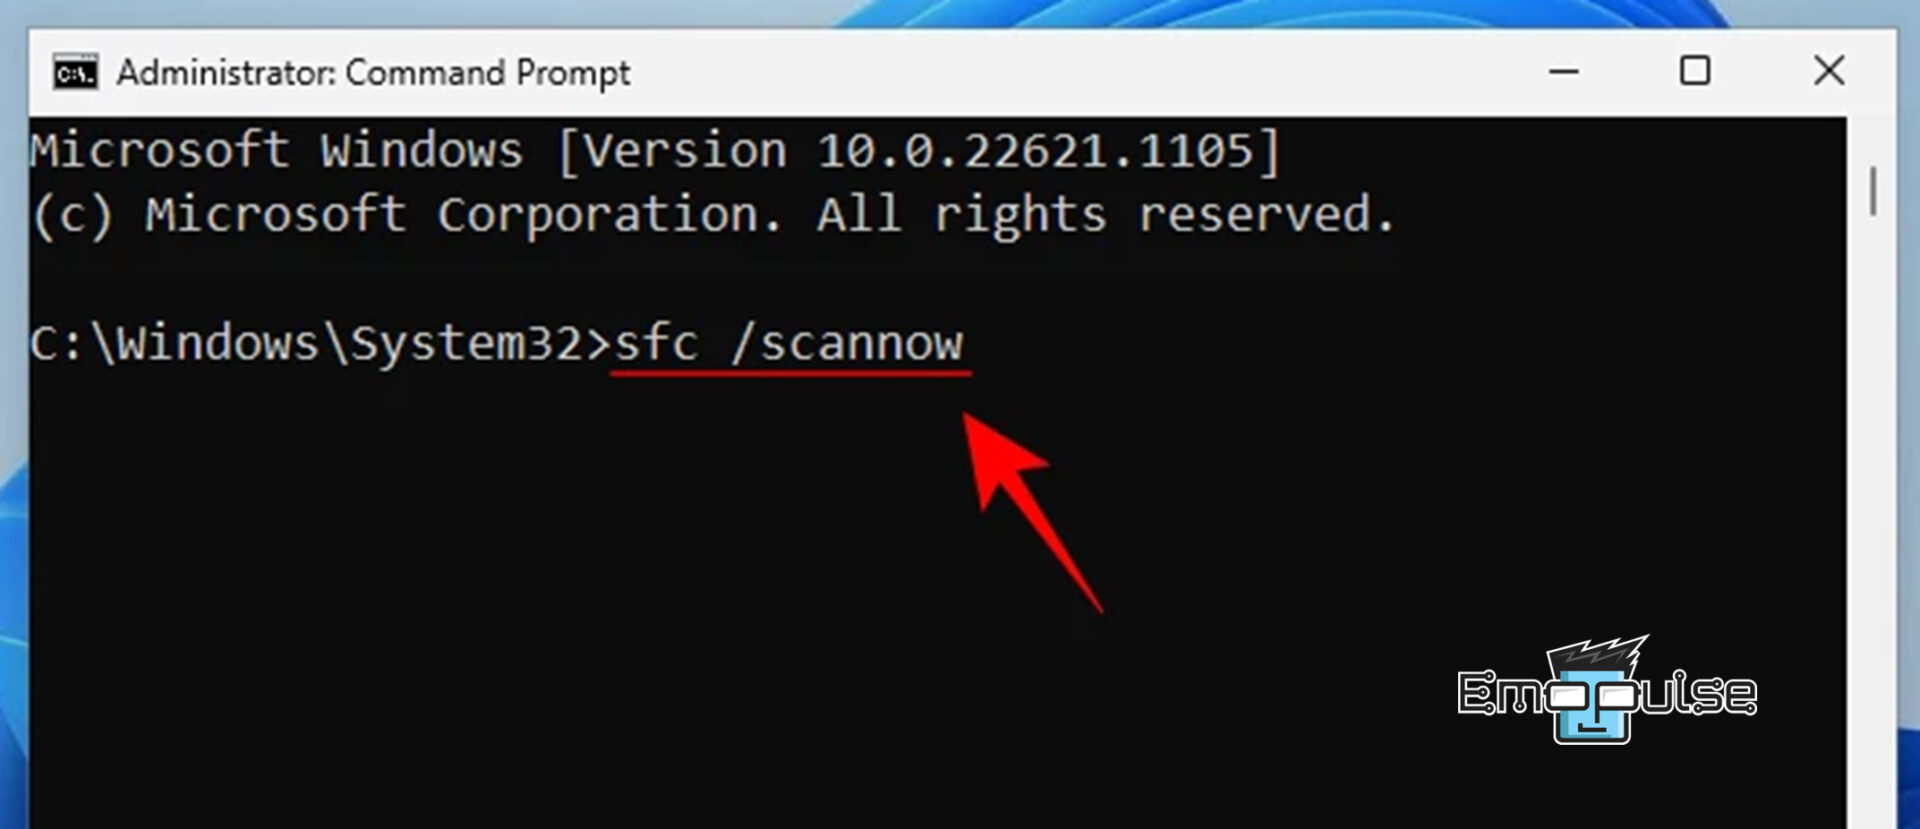
Run SFC, DISM, And CHKDSK Scan
Corrupted files could trigger a BSOD, but sometimes, it causes files to appear corrupted. While scanning and fixing errors is a good start, it may not solve everything. However, I opened an elevated command prompt (CMD as Administrator) and entered the following commands:
SFC
- Enter command: “sfc /scannow.”

Run command – Image Credit (Emopulse) - Restart PC: Give it a few minutes for the scan to finish, then restart your PC to evaluate the situation.
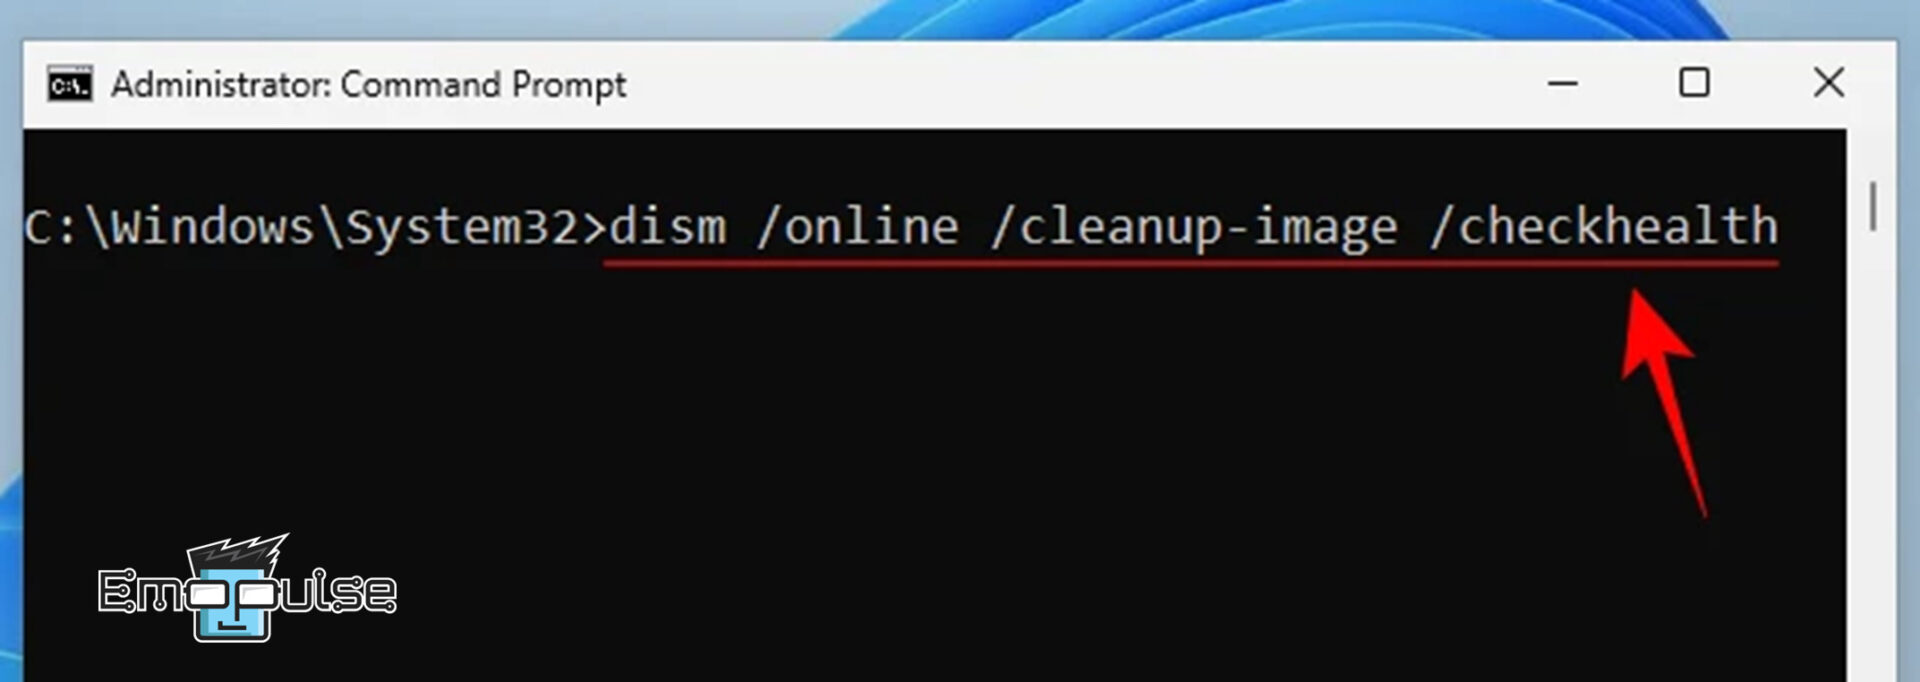
DISM
- Run 1st command: To use DISM, you must execute three commands. First, type “Dism /Online /Cleanup-Image /CheckHealth.”

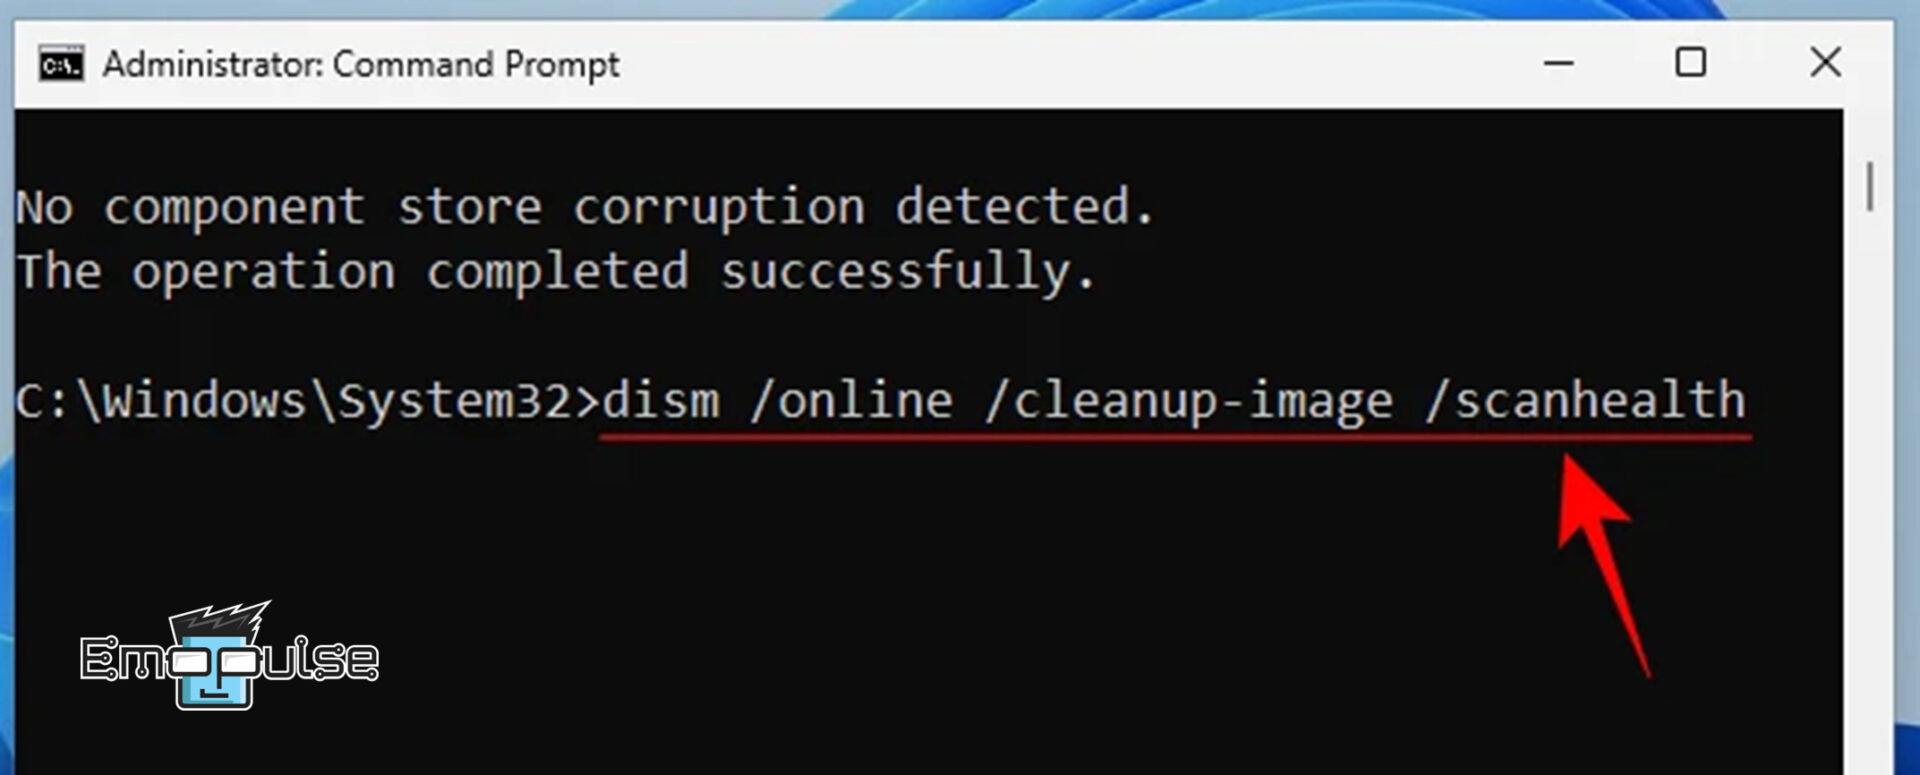
Run command – Image Credit (Emopulse) - Run 2nd command: Next, hit enter and run 2nd command “Dism /Online /Cleanup-Image /ScanHealth.”

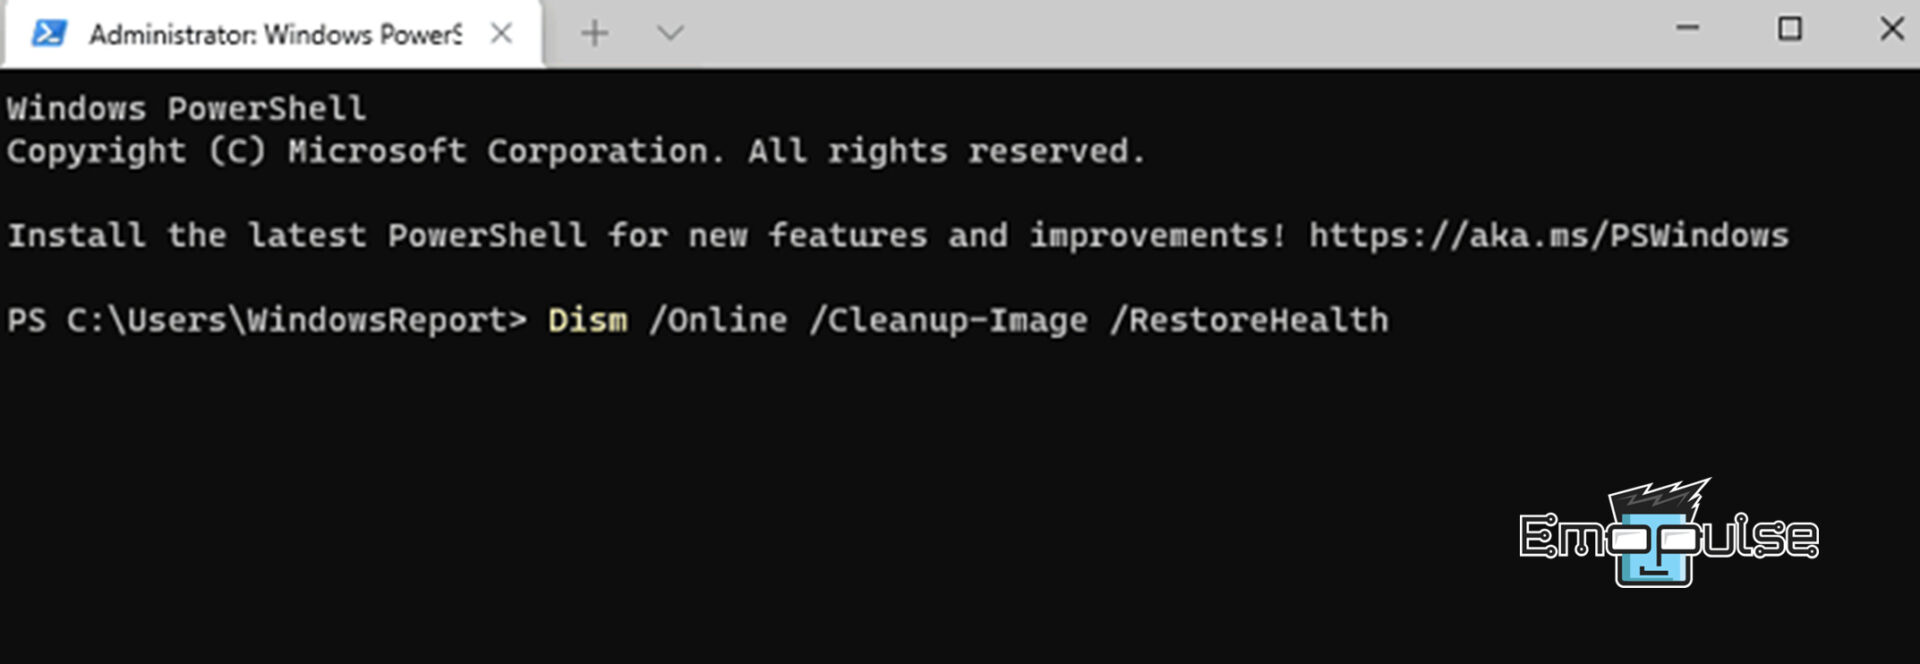
Run command – Image Credit (Emopulse) - Run 3rd command: Lastly, input the 3rd command “Dism /Online /Cleanup-Image /RestoreHealth” and wait for each scan to complete to resolve the error.

Run command – Image Credit (Emopulse)
CHKDSK
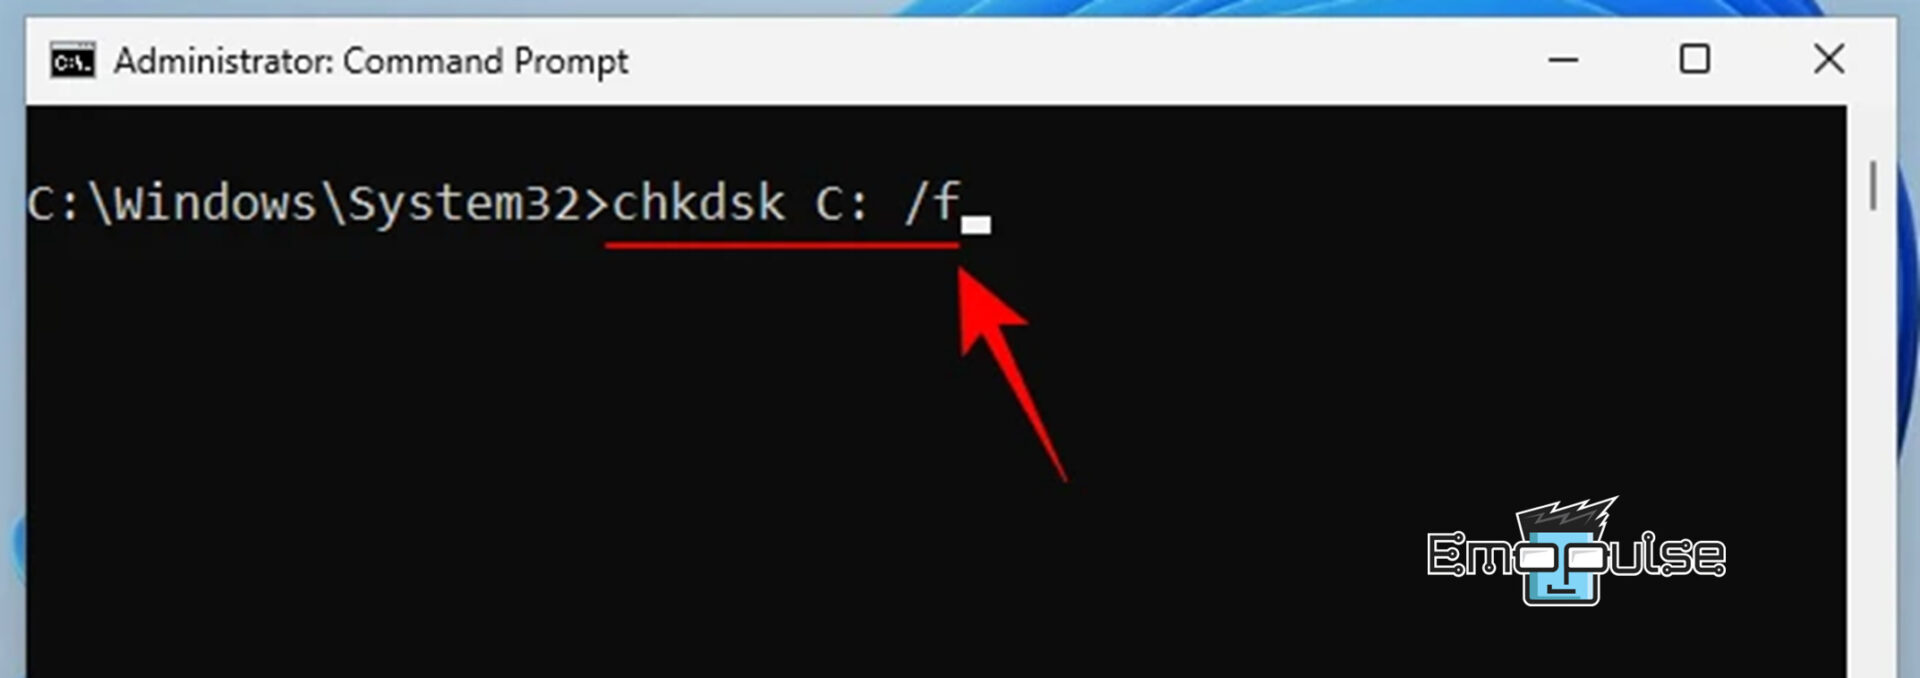
- Run the command: To perform a CHKDSK scan, run the command “chkdsk C: /f.”

Run command – Image Credit (Emopulse) - Type “Y”: Press Enter, and type “Y” for yes when prompted to schedule the disk check upon Restart.

Type Y – Image Credit (Emopulse)
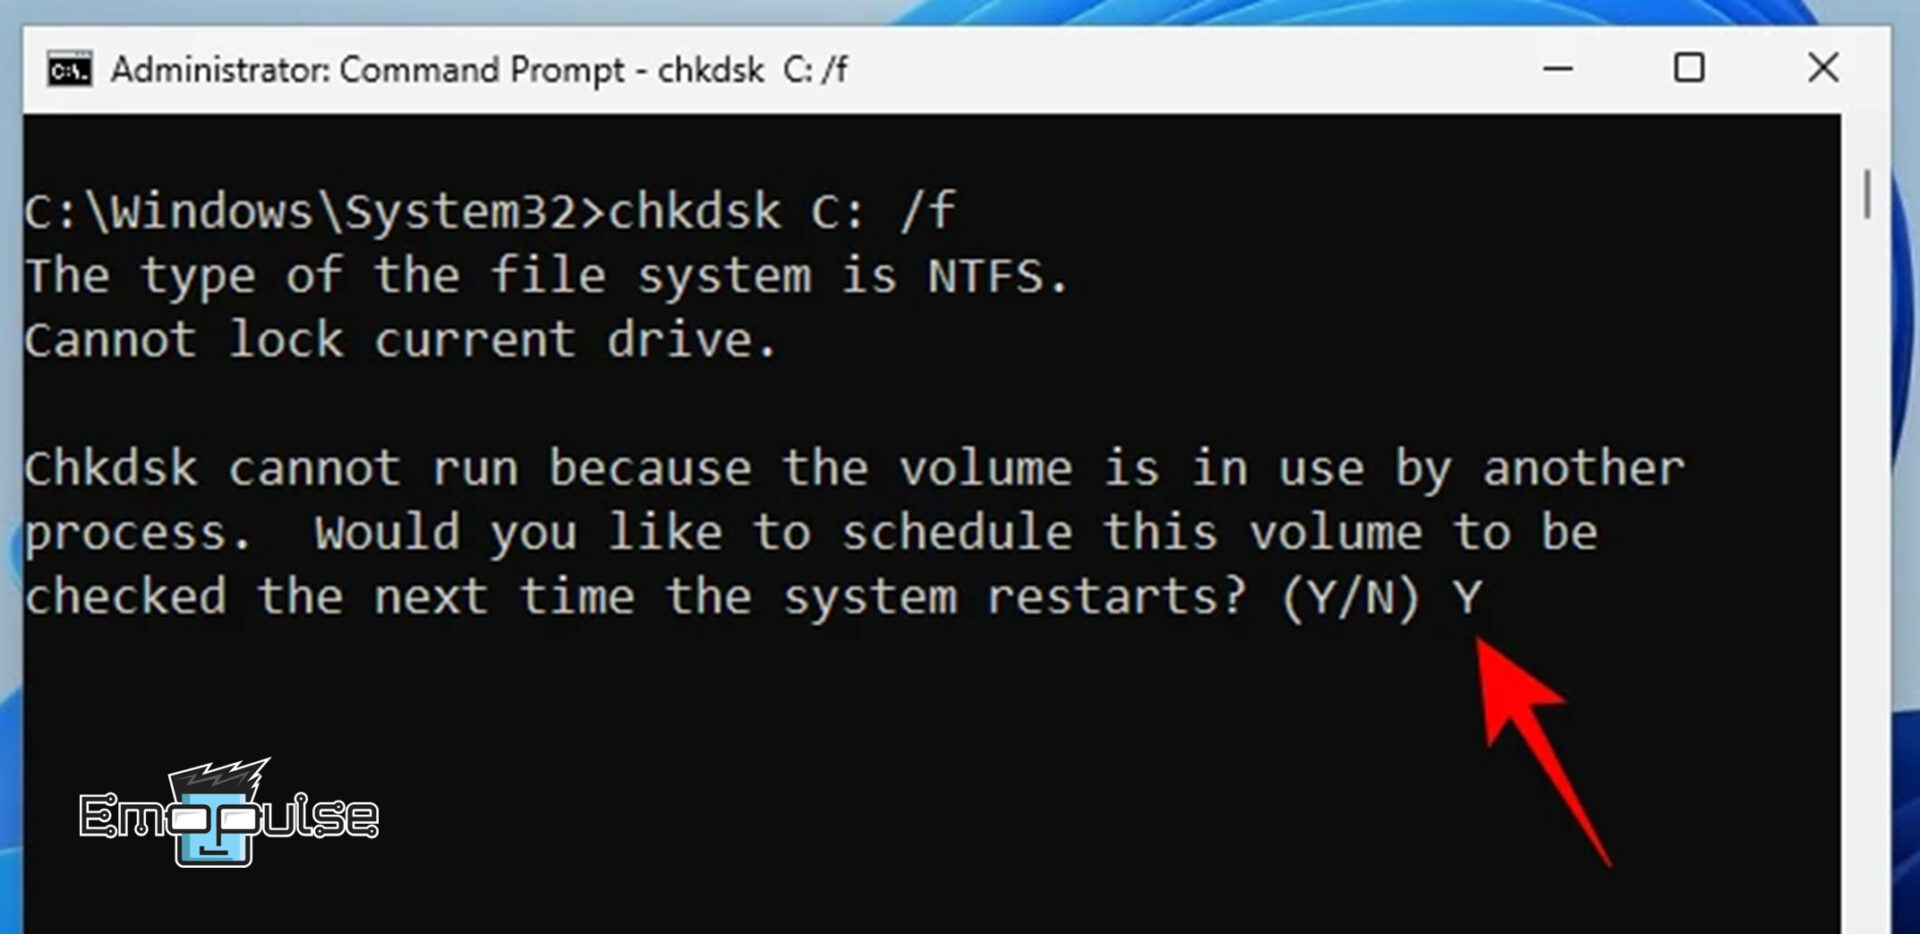
Note: Reboot your computer to initiate the disk check scan to diagnose and address any existing issues.
Run Windows Memory Diagnostic Tool
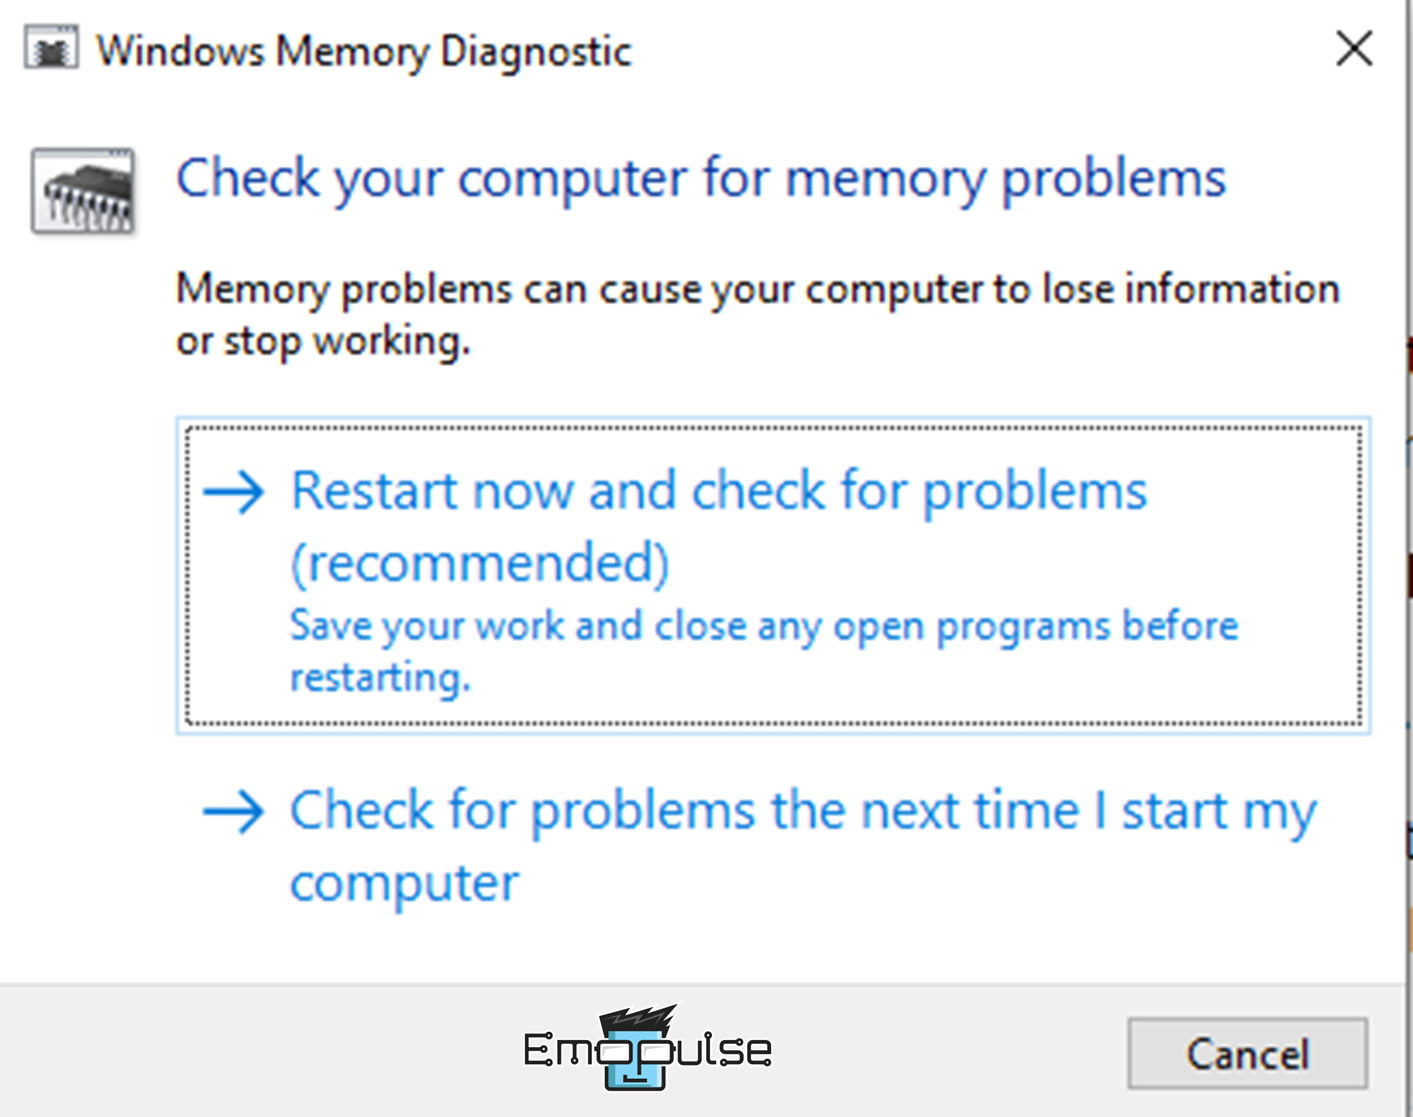
Errors like Kernel Security Check Failure can indeed be associated with memory problems. To investigate and potentially resolve this issue, I also utilized Windows’ built-in memory diagnostic tool to test my PC memory. To do so:
- Windows Safe Mode: As mentioned above, access the Windows Recovery Environment and activate Windows Safe Mode with networking.
- Run dialog box: Press Windows + R to open the Run dialog, type “mdsched,” and select OK.
- Restart now: Now select 1st option, Restart now, and check for problems.

Windows Memory Diagnostic > Restart now – Image Credit (Emopulse) - Feedback: Once the check is complete, you will receive feedback regarding your computer’s memory status.
Note: If faulty memory is detected, replace the defective module immediately. After replacement, restart your computer to check if the error persists. If it does, move on to the next troubleshooting solution.
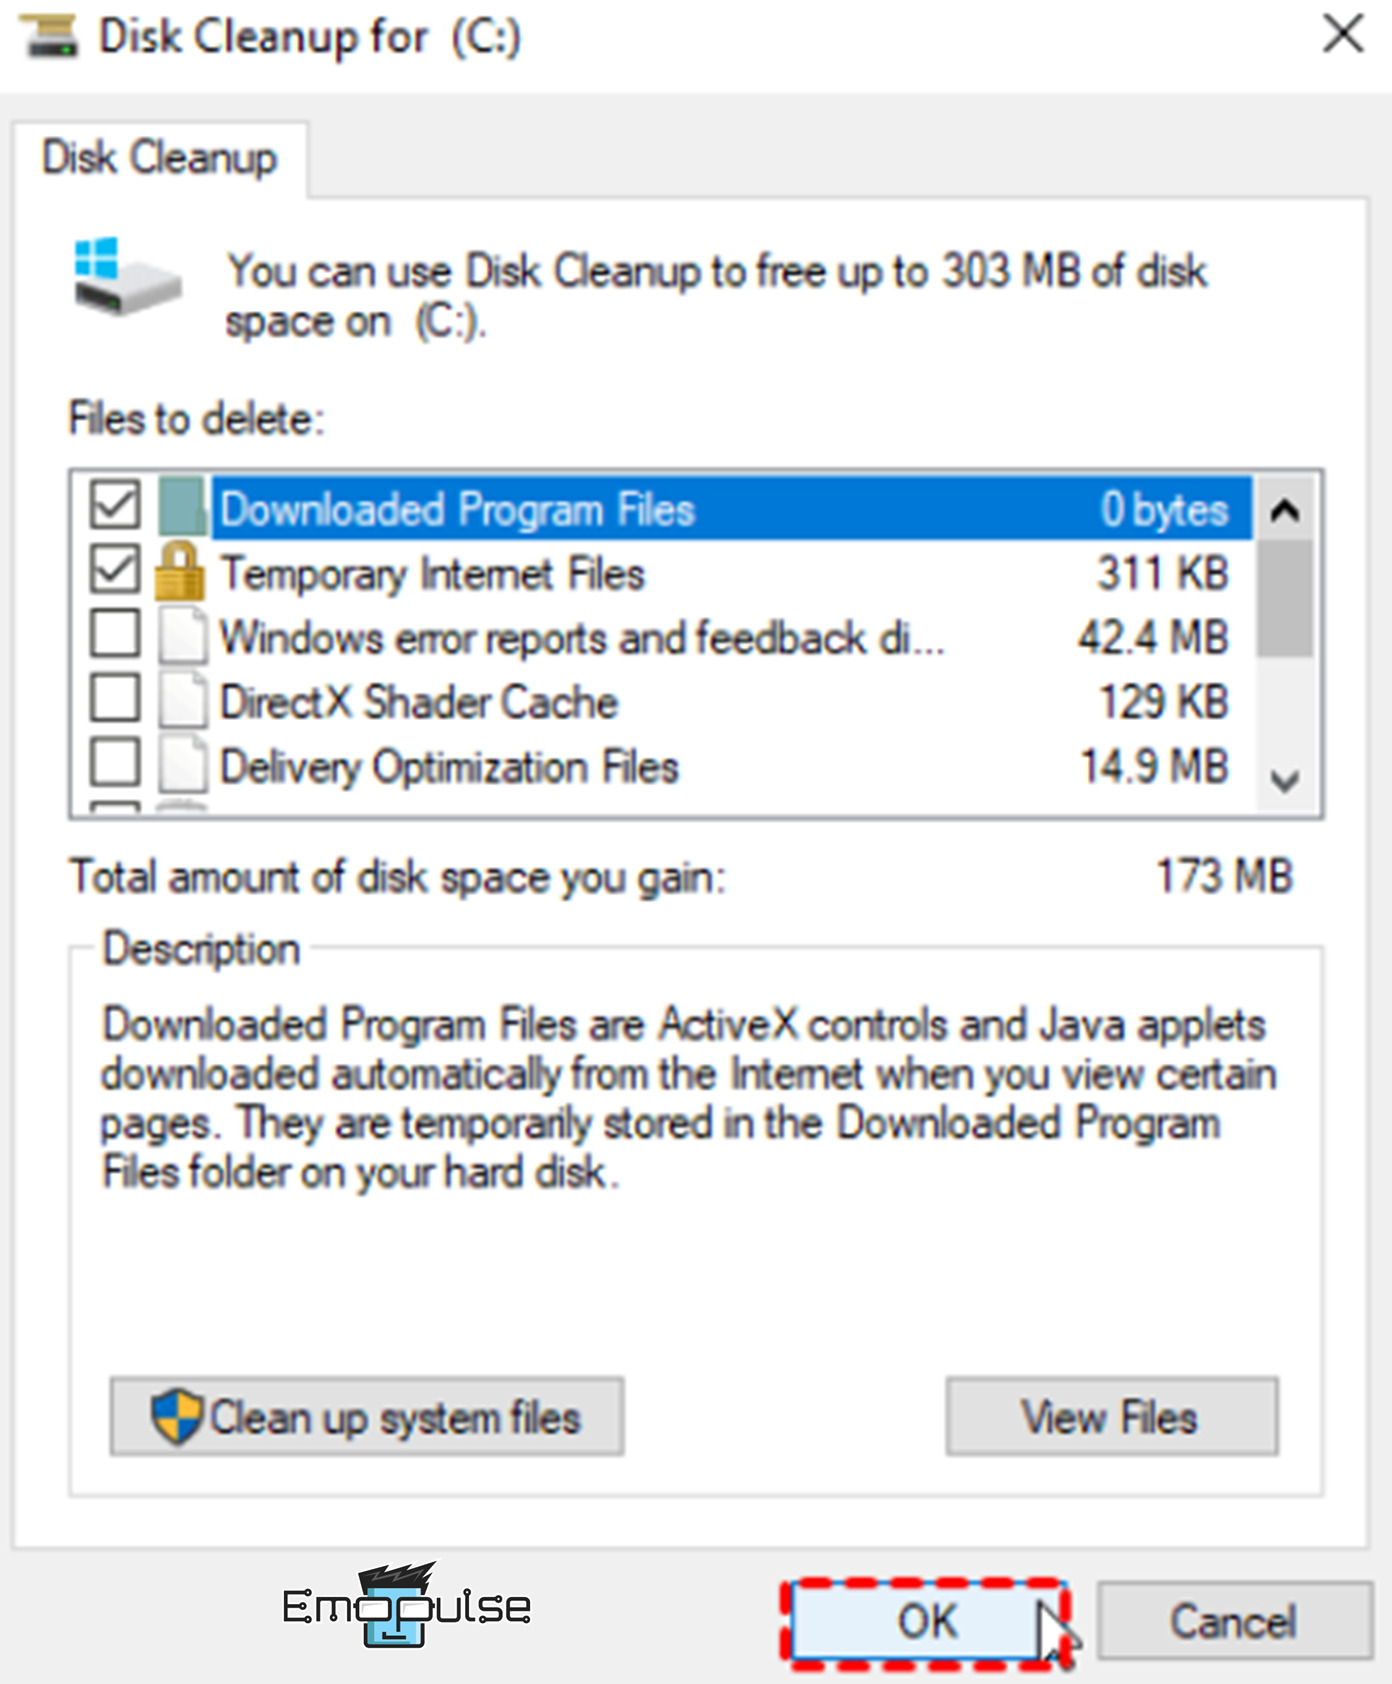
Clear Disk Space
Inadequate disk space can cause various issues, including the “Kernel Security Check Failure” error. To tackle this problem, my fellows tried freeing up their computer’s disk space. Here’s how:
- Windows Explorer: Press Windows + E to open Windows Explorer while in Safe Mode.
- Disk Cleanup: Right-click on the local disk C, then select “Properties > General Tab > Disk Cleanup”.
- Delete files: Choose the files you wish to delete, then click OK. You can select all types of items for thorough cleanup.

Clear disk space – Image Credit (Emopulse)
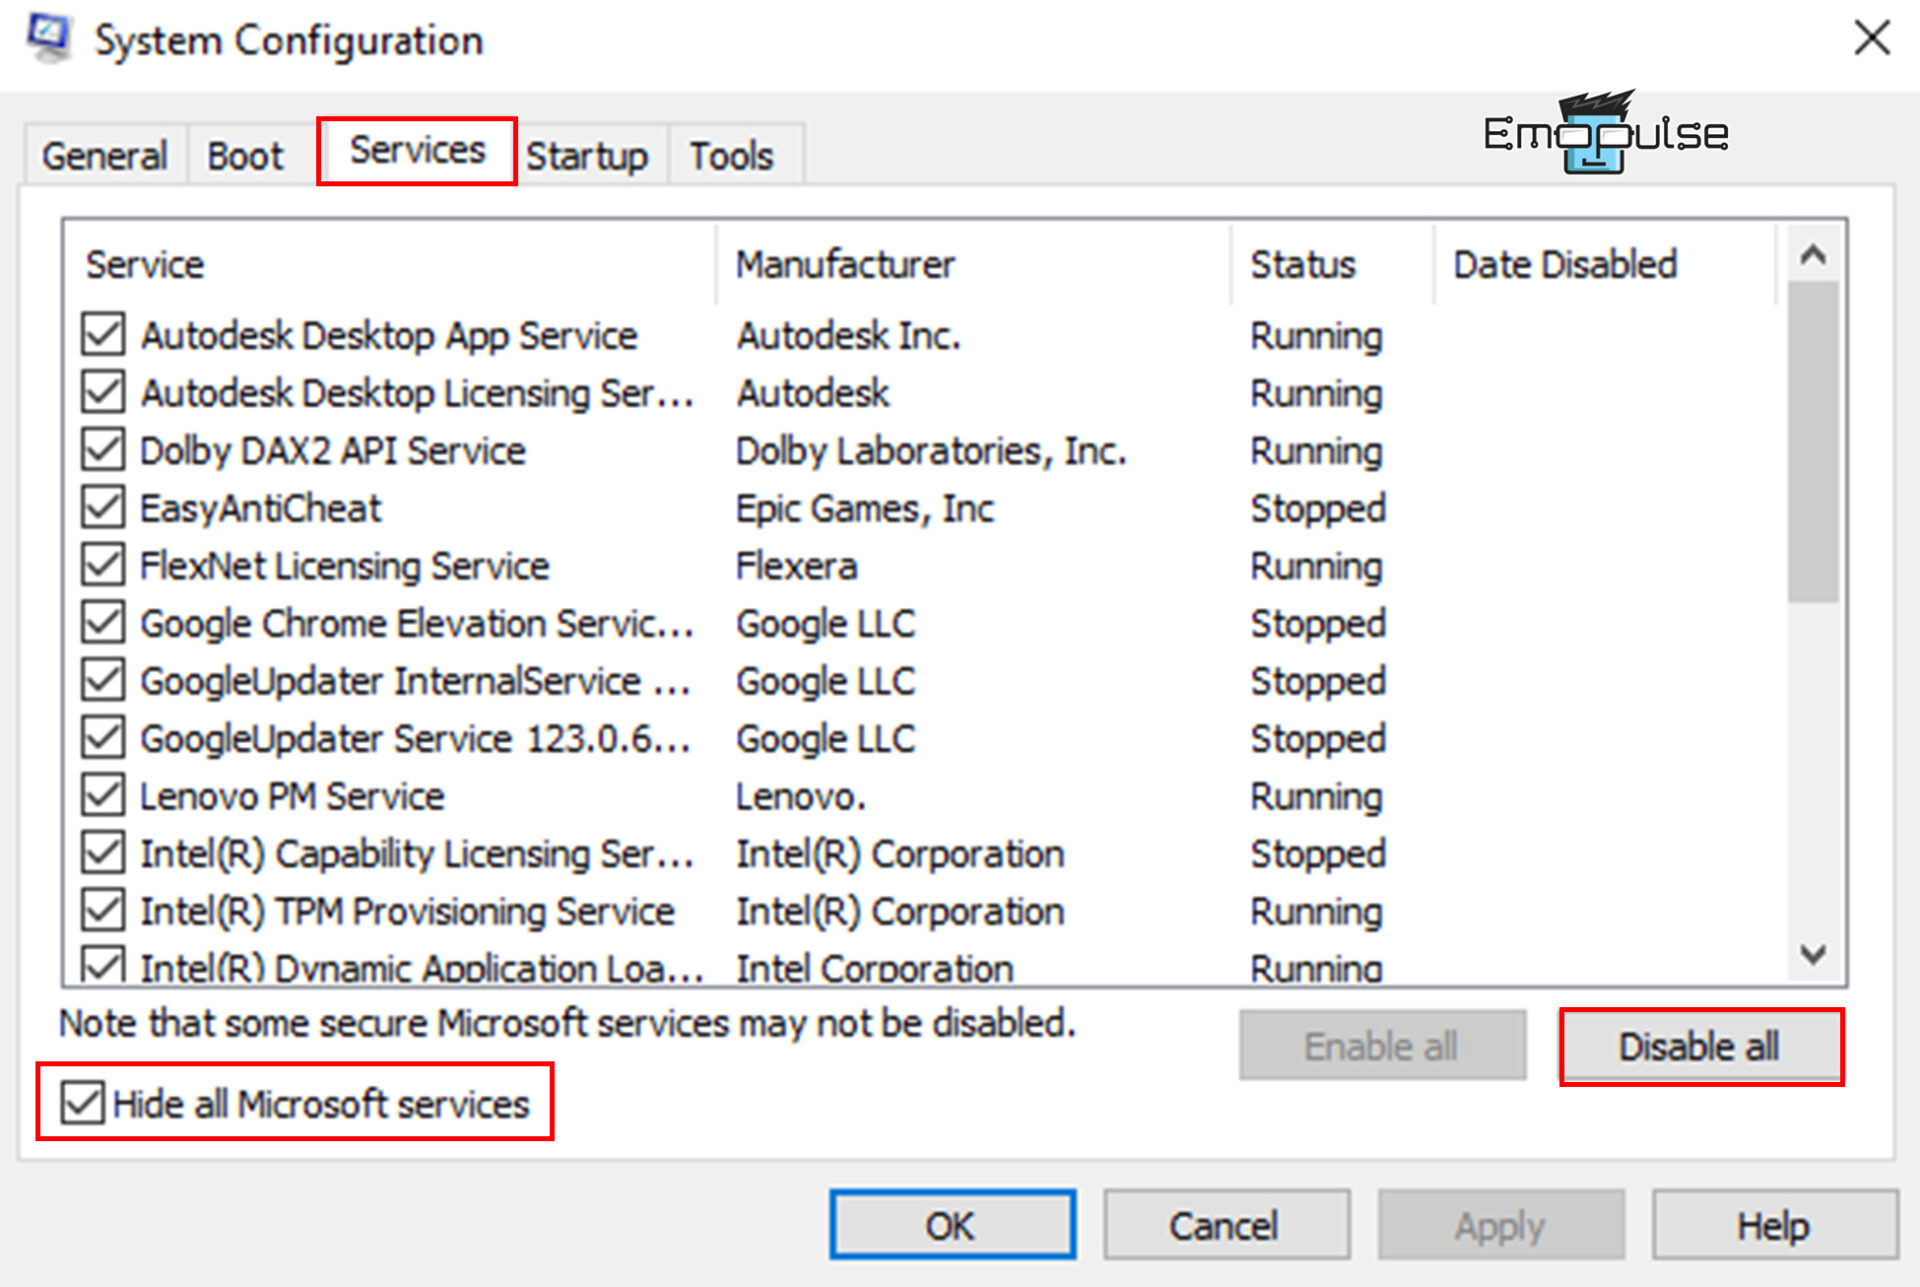
Perform A Clean Boot
A Clean Boot is a Windows diagnostic mode similar to Safe Mode, but with a difference: you need to turn off third-party applications and services manually. This approach resolved my colleague’s “Windows Kernel Security Check Failure” error on Windows 11. Keep in mind that it involves booting into the Windows system as usual. Here’s what they did:
- Run Dialog: Now press Windows + R to open the Run Dialog while in Safe Mode, type “mdsched”, and select OK.
- Disable: Go to the “service tab > check “Hide all Microsoft services” > Disable All”.

System configuration – Image Credit (Emopulse) - Task Manager: Next, on the Startup tab of System Configuration, choose Open Task Manager.
- Disable: In the list of startup items, select each one, click the Disable button for each, and then close the Task Manager.
- Confirm OK: Return to the Startup tab of System Configuration and click OK.
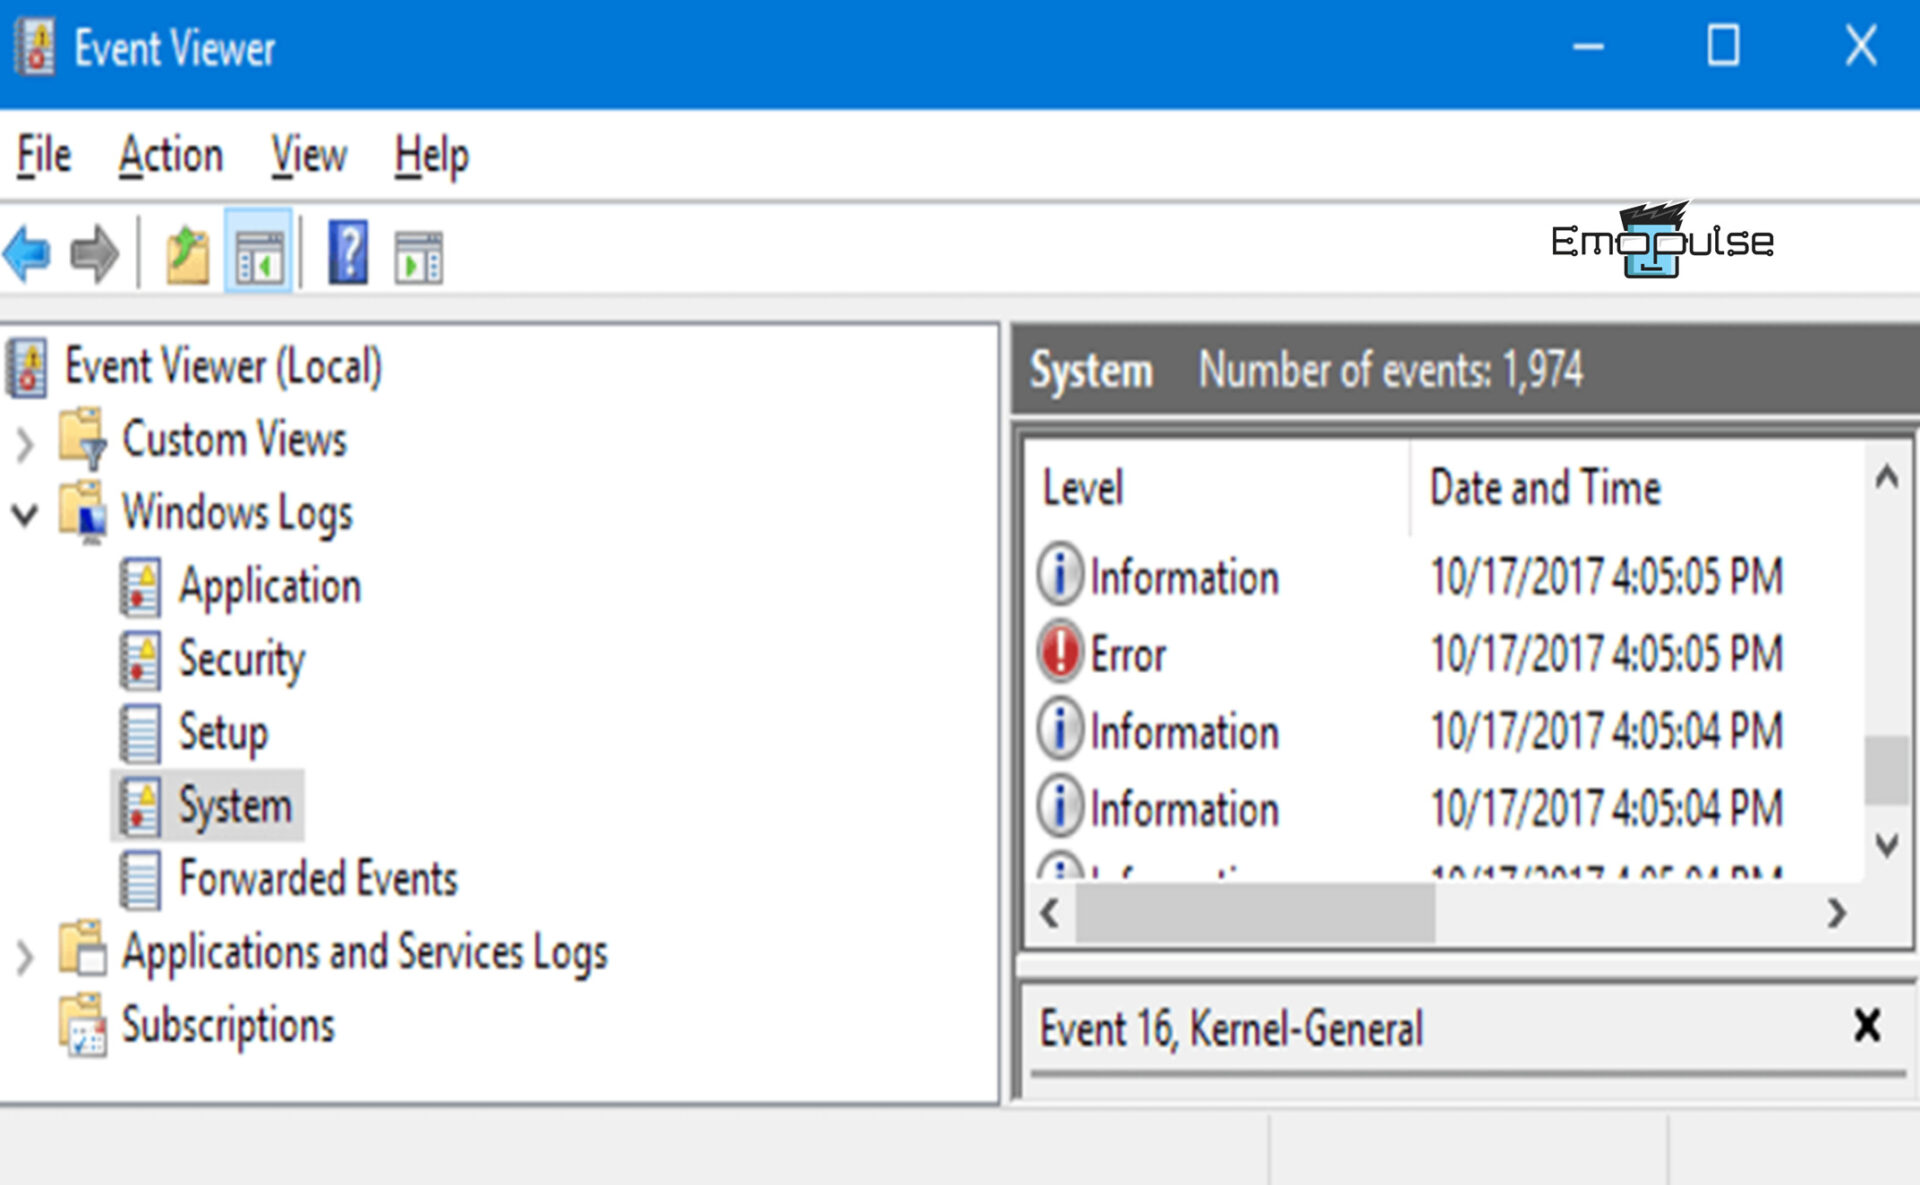
View The Event Log File
You can check the event log file to identify the cause of the “Kernel security check failure” error and take appropriate action. Here’s the procedure I followed:
- Event Viewer option: Right-click the Start button in Safe Mode and choose the Event Viewer option.
- System: Expand the Windows Logs section in the left panel, then choose system.

View event log file – Image Credit (Emopulse) - Review error description: Select each error in the list and review their descriptions. If you recently encountered a blue screen error, focus on the first error log.
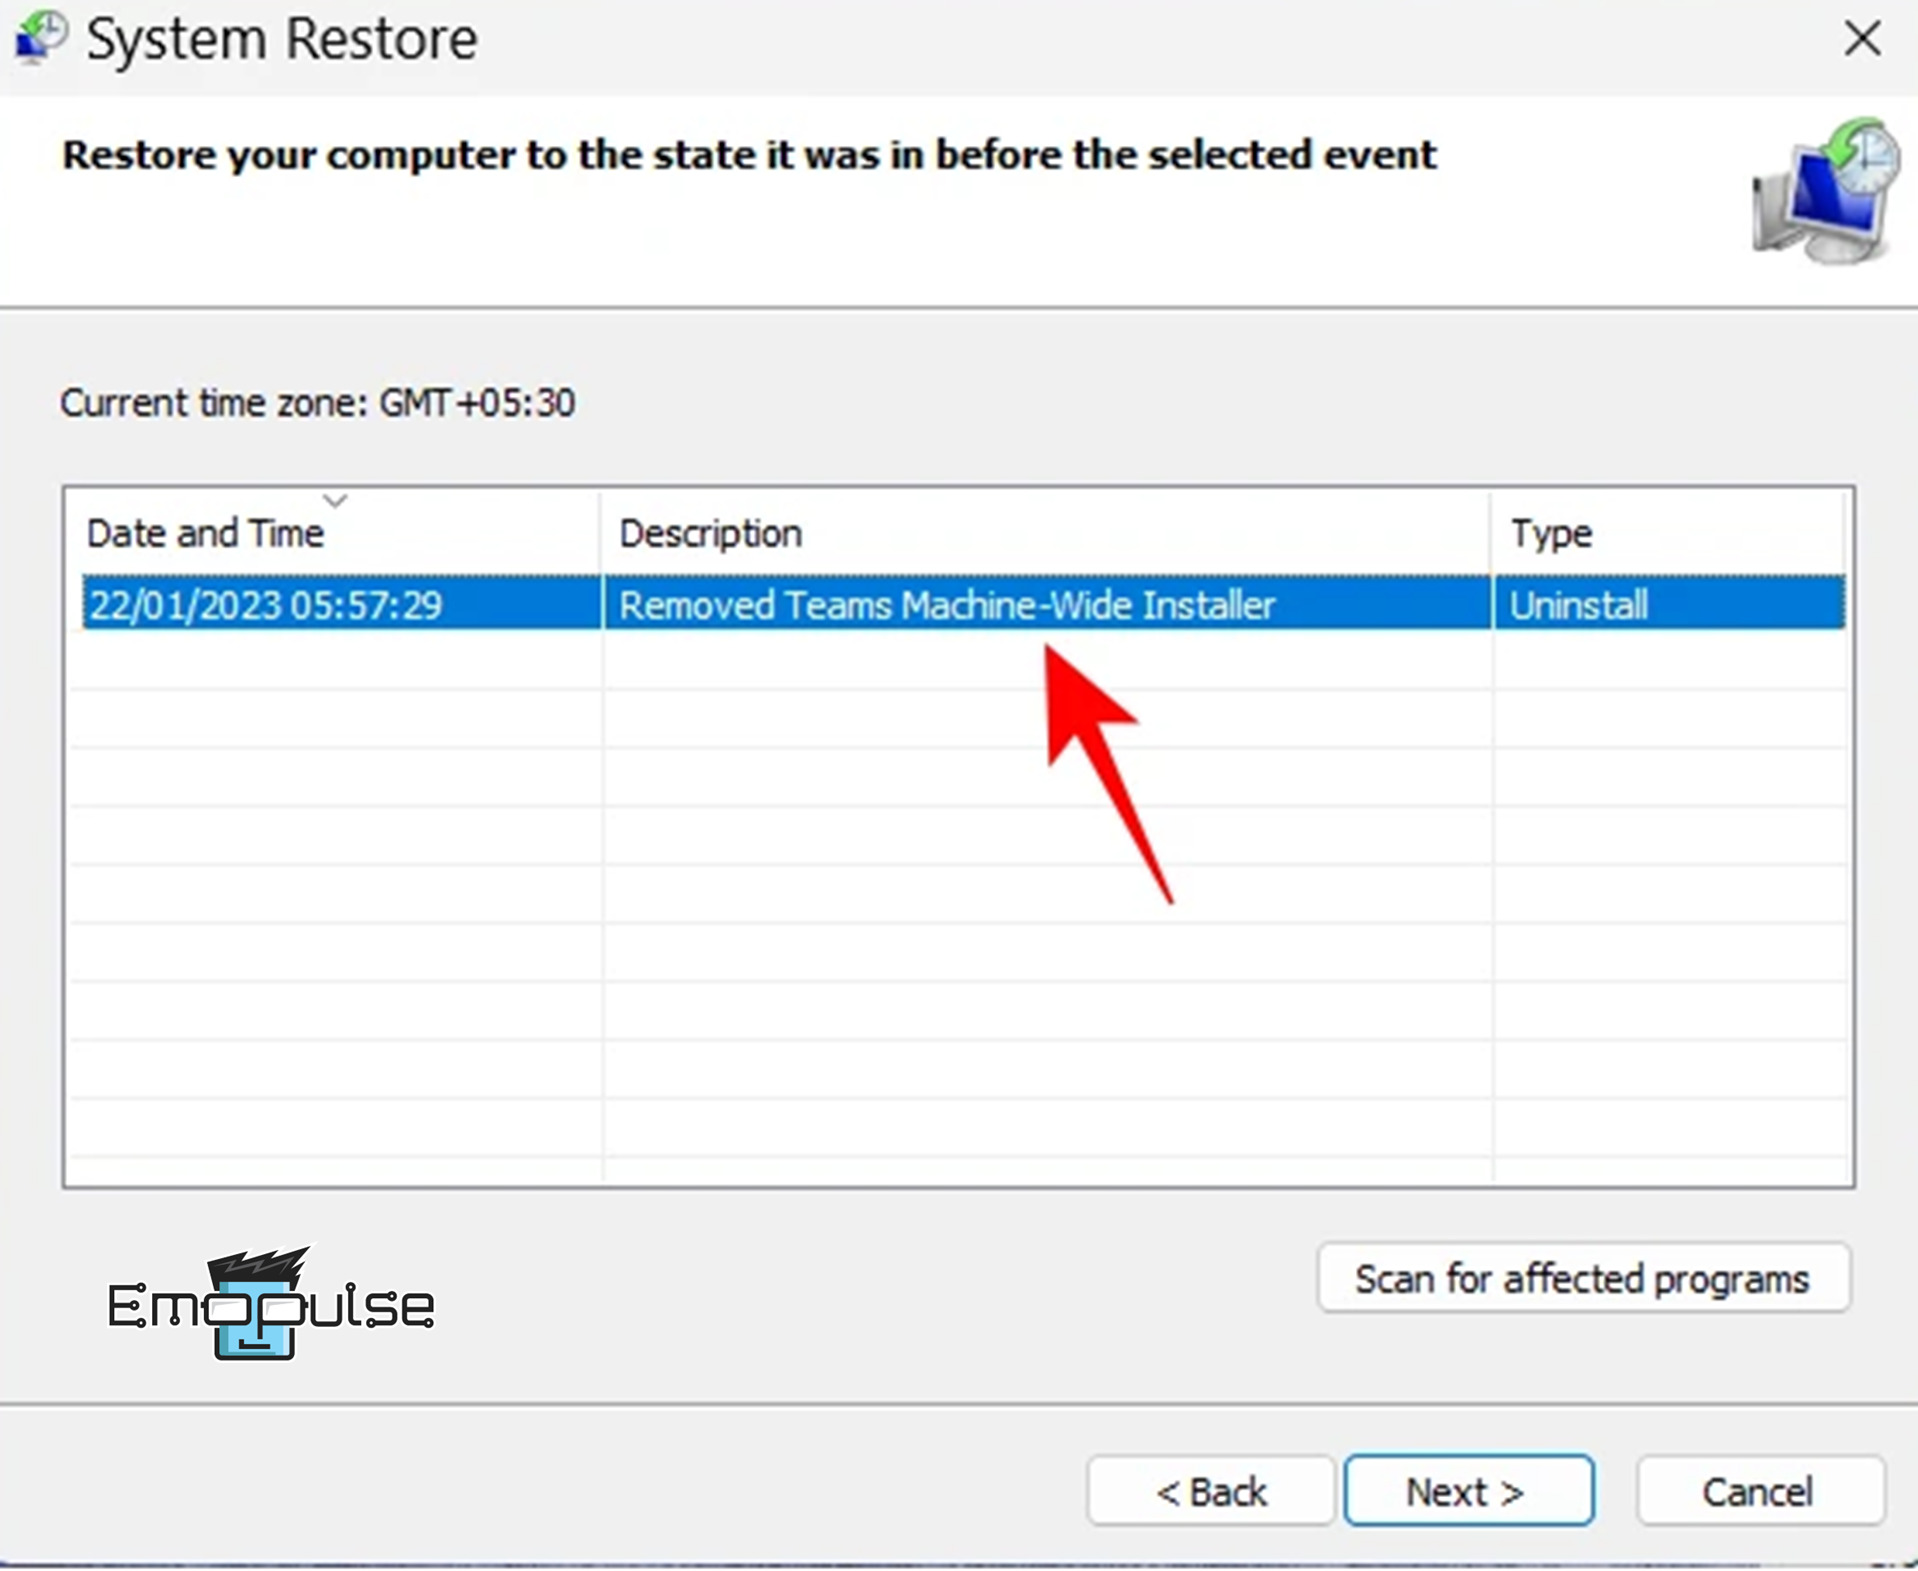
Use System Restore
I fixed the “Critical Process Died” problem by returning the system to its previous stage. This is done using the System Restore point that was set up before. Doing this doesn’t mess with your files but undoes any recent changes made to your computer. Follow these simple steps below to get it done:
- Enter command in Run Dialog: Press both the Windows and R keys simultaneously to open a box called Run Dialog. Then type in “rstrui.exe” and press Enter.
- System restore: Within the System Restore window, choose Next, then select the restore point you want, and lastly, click on “Next > Finish” to continue.

System Restore – Image Credit (Emopulse) - Follow on-screen instructions: Follow the instructions and wait for the system to finish restoring. This could take a while, so be patient.
Final Words
After applying all the fixes, if you are still getting this Kernel error, it could be related to a RAM module. Therefore, consider replacing it to see if it resolves the issue, as it also proved helpful for other users. Further, format your drive on another computer or replace your drive, then perform a fresh installation of Windows. Moreover, disconnect extraneous devices from the PC, as sometimes, we connect a faulty or incompatible device to our PC that causes interference with our system’s working and displays this system error.
Check out our more windows related guides on:
Frequently Asked Questions
What does the stop code Kernel Security Check Failure mean?
The Kernel Security Check Failure, the blue screen of death (BSOD) error stop code, means that your PC ran into problems with memory, malfunctioning hardware, viruses, outdated Windows version, software conflicts, or driver incompatibility.
Is it possible for a BSOD (Blue Screen of Death) to cause hardware damage?
While a BSOD itself typically doesn't cause hardware damage, frequent instances could potentially result in data corruption. To safeguard against this, it's advisable to regularly back up crucial files and maintain a system that is up-to-date and protected against malware.
Is it possible for overheating to lead to a blue screen?
Elevated temperatures pose a significant risk to electronic components, potentially leading to blue screens, system crashes, and potential damage.
Good job! Please give your positive feedback
How could we improve this post? Please Help us.