The PlayStation 4 (PS4) controller stands out as an exceptional product, renowned for its durability and reliability. Nonetheless, occasional issues can arise. Recently, I encountered a situation where my PS4 controller faced an unforeseen problem that required a closer look.
Taking apart the PS4 controller became a crucial step in troubleshooting and addressing the issue at hand. In case you find yourself in a similar situation, like many Reddit users, and wondering how to take apart a PS4 controller, I have discussed everything in this guide.
Key Takeaways
- Dissecting a PS4 controller for troubleshooting involves careful step-by-step disassembly, revealing internal components and potential issues affecting its functionality.
- The need to open the PS4 controller arises when facing issues, such as unresponsiveness or malfunctions, requiring a closer examination of internal components.
- To resolve problems, carefully follow the steps to open the controller, addressing issues like disconnected cables or faulty components for optimal gaming experience.
Before you move to taking apart the PS4 controller, make sure of the following things:
- Consider backing up game profiles or saves stored in the controller.
- Disconnect the controller from consoles or devices
- Power it down
How To Take Apart PS4 Controller?
The first step I took was opening the controller to look closely at the internal components to find the fault. Here are the steps to dissect your control:
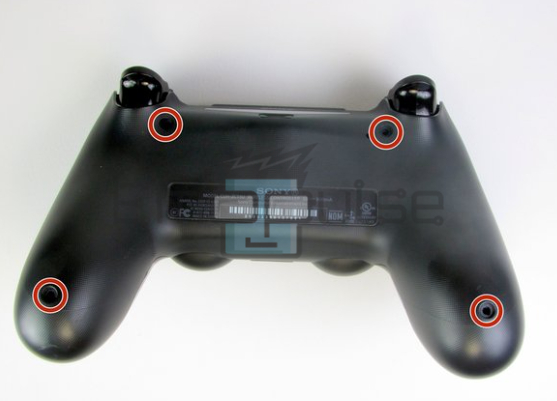
- Accessing Screws: Begin by locating and removing the four screws positioned on the back of the PS4 controller. This step serves as the initial stage to loosen the back plate.

Accessing Screw – (Image by Emopulse) - Handle Separation: Squeeze both handle parts of the controller simultaneously; this action will cause the handles to pop apart, facilitating the disassembly process.
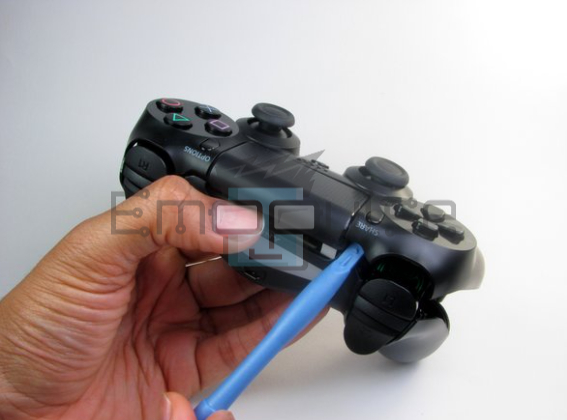
- Focused Force near Home Button: Direct your attention to the area below the home button. Apply a bit of force as two clips are holding the controller together. This step might require a bit more effort.

Apply Force near Home Button – (Image by Emopulse) - Gentle Back Plate Removal: The bottom part is now loose; gently pull the back plate off. Anticipate some cracking sounds, which are simply the plastic clips coming apart. Exercise care during this process, as there are internal ribbon cables that need attention.

Plate Remove – (Image by Emopulse) - Managing Ribbon Cables: Once the plastic part has separated from the back, carefully remove the ribbon cable connecting the light bar to the main board of the controller. This step ensures the safe removal of the back plate from the DualShock 4.
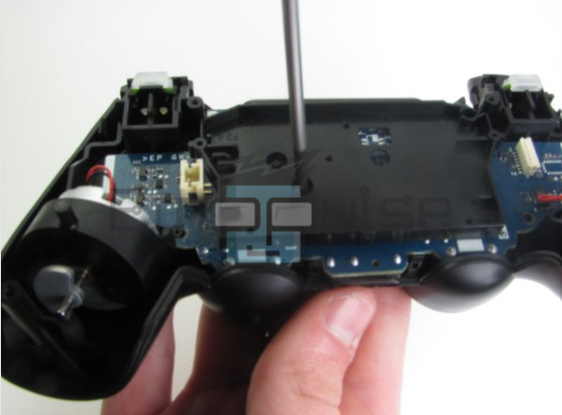
- Disconnect Battery: Start by disconnecting the battery and locating an additional screw beneath.
- Release Main Board: Remove the screw to release the main board; use a button or stick pressure for a slight lift.

Release main board – (Image by Emopulse) - Detach Touchpad Ribbon Cable: Remove the ribbon cable connecting the touchpad at the top.
- Gently Lift Main Board: Lift the main board carefully using responsive actions.
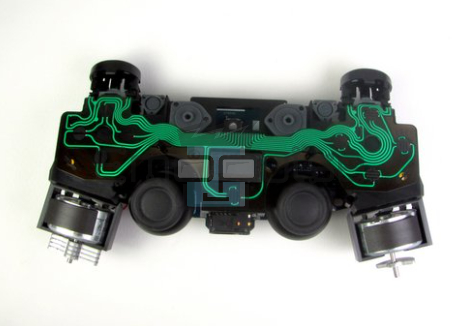
- Finalize Disassembly: Ensure all components are detached, leaving the Dualshock 4 in three pieces for further adjustments.

Disassembly Completed – (Image by Emopulse)

And you are all done with taking apart your PS4. It rarely happens that the controller just dies out and does not respond to anything like a new battery and other quick methods. It becomes necessary to dismantle the whole controller, as has happened with different users on iFixit.
Final Thoughts
Many users feel that taking apart the PS4 controller is an overwhelming process, but with the right steps, it’s a straightforward process. Just ensure careful attention to detail when handling screws, separating handles, and removing the back plate. Don’t forget to manage the ribbon cables and disconnect the battery. By doing so, you’ll gain a deeper understanding of the internal components, making adjustments easier.
You might want to read these guides as well:
Frequently Asked Questions
What tools do I need to take apart a PS4 controller?
You'll only need a small Phillips-head screwdriver for this process. Some people recommend using a plastic spudger tool to gently pry open the case, but it's not strictly necessary.
How do I know if I need to take apart my PS4 controller?
If your controller is experiencing issues like unresponsiveness, button malfunctions, or connection problems, taking it apart might be necessary to diagnose the problem. However, try simpler troubleshooting steps like resetting the controller or replacing the batteries first.
Is it safe to take apart my PS4 controller myself?
While disassembling your controller isn't inherently dangerous, it requires some precision and care. If you're not comfortable tinkering with electronics, it's best to seek professional help or consider sending your controller to Sony for repair. Remember, taking apart your controller will void its warranty.
Good job! Please give your positive feedback
How could we improve this post? Please Help us.